
I am going to explain how I managed to implement Microsoft Office Interop support for multiple Microsoft Office versions using C#.
![]()
Requirements
Our solution should meet the following requirements:
- support for different Microsoft Office versions
- no Microsoft.Interop.dll deployment
- dispose of all (unmanaged) resources
- no use of dynamic keyword
- no direct COM calls
Prerequisites
In order to implement the solution explained in this article, you need the following:
- Visual Studio 2010 or higher installed
- Microsoft Office or Microsoft Office Primary Interop Assemblies (PIA) installed (2007)(2010)
- .NET Framework 4.0 or higher as target framework
Introduction
By using .NET 4, we can use “embedded” PIA (Primary Interop Assemblies). This means that we don’t need to ship the referenced interop assemblies with our product. I am going to explain in detail how to do this in this article.
Choose your target Office version
If you want to support multiple versions of Microsoft Office, you need to make sure that the functionality you want to use is provided by any Office version. Microsoft helps us by providing consistent APIs that are fully compatible with the previous versions.
This means that we can simply choose the lowest version we want to support. In this example, I want to support Office 2007, 2010 and 2013. Therefore, I choose Office 2007 as my lowest version. Office 2007 has the version number 12.0.
Setting up the Visual Studio project
As we know we want to target Office 2007 (12.0), we set up our Visual Studio project. First of all, make sure to set the target framework of your project to .NET Framework 4.0 in the project properties.
Next, you have to add a reference to Microsoft.Office.Interop.Excel.dll.
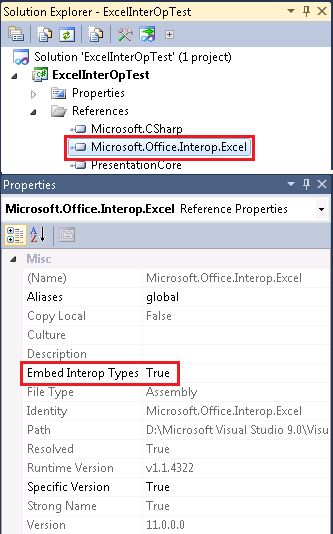
Double check that the property Embed Interop Types is set to true. This means that any code interacting with the COM interface will be directly built into your own .exe /.dll. If you set the property to false, you have to ship the Microsoft.Office.Interop.Excel.dll with your product. Take a look at the bin/debug directory if you want to know how the result looks like.
How to interact with Excel
Instead of explaining, I will show some code which interacts with Microsoft Excel:
public class ExcelInterop
{
	private Application _application;
	private Workbook _workbook;
	private Worksheet _worksheet;

	public void ExportSampleFile()
	{
		int[] values = { 4, 6, 18, 2, 1, 76, 0, 3, 11 };

		CreateWorkbook(values, @"C:\Temp\SampleWorkbook.xls");
	}

	private void CreateWorkbook(int[] values, string filePath)
	{
		try
		{
			// Start Excel and create a workbook and worksheet.
			_application = new Application();

			_application.WorkbookBeforeClose +=
				(Workbook wb, ref bool cancel) => Dispose();

			_workbook = _application.Workbooks.Add();
			_worksheet = _workbook.Sheets.Add() as Worksheet;
			_worksheet.Name = "Sample Worksheet";

			// Write a column of values.
			// In the For loop, both the row index and array
			// index start at 1.
			// Therefore the value of 4 at array index 0
			// is not included.
			for (int i = 1; i < values.Length; i++)
			{
				_worksheet.Cells[i, 1] = values[i];
			}

			// Suppress any alerts and save the file.
			// Create the directory if it does not exist.
			// Overwrite the file if it exists.
			_application.DisplayAlerts = false;
			string folderPath = Path.GetDirectoryName(filePath);
			if (!Directory.Exists(folderPath))
			{
				Directory.CreateDirectory(folderPath);
			}
			_workbook.SaveAs(filePath);

			_application.Visible = true;
			_workbook.Activate();
		}
		catch
		{
			Dispose();
		}
	}

	public void Dispose()
	{
		ReleaseComObject(_worksheet);
		_worksheet = null;

		ReleaseComObject(_workbook);
		_workbook = null;

		if (_application != null)
		{
			_application.Quit();
		}
		ReleaseComObject(_application);
		_application = null;
	}

	public static void ReleaseComObject(object obj)
	{
		if (obj != null && Marshal.IsComObject(obj))
		{
			Marshal.ReleaseComObject(obj);
		}
		GC.Collect();
		GC.WaitForPendingFinalizers();
		GC.Collect();
		GC.WaitForPendingFinalizers();
	}
}
How it works
With the reference property set to Embed Interop Types, the compiler will include the COM calls directly into our assembly. Therefore, we don’t have to ship a specific version of a Microsoft Office Interop assembly with our product.
Running on the client environment, our product will make use of the installed version, whatever this version might be. The only thing to remember is that you cannot support older versions of Office that you build your product with. So, be sure to build with the correct (oldest) version of the Office Interop assemblies.
Consider this approach if you would like to have an interop solution without using the dynamic keyword. As you can see in the code example, all calls are made upon statically typed objects.
Tests
I tested this solution on multiple computers with different settings. This means different versions of Microsoft Office installed. Some of the computers ran Windows 7 and some Windows 8. In addition, there were some machines that had Visual Studio installed but others didn’t.
Building on a machine without Office installed
To be able to build the solution, you’ll need to have Office installed on your machine. This can be painful if you’re dealing with a CI server.
I found a simple way around this problem. First, change the Embed Interop Types property to false and rebuild your solution. You’ll end up with a Microsoft.Interop.*.dll in your bin/debug directory. Now take this assembly and store it in your project as a .dll. Next, you’ll have to update your project references to that new location, instead of directly referencing the installed version in your installation path.
After that, you can change the Embed Interop Types to true and rebuild again. You should now be able to build without the need of an Office installation on your machine.
Check the second last section of this article where you can find a sample project illustrating this in more detail.
Updating to a higher version
If you ever want to support a newer version as the “oldest” one, you can simply exchange the dll you reference and repeat all the steps described in this article. This is really a no-brainer.
Completed example code (Download)
You’re able to download the completed ExcelInterOpTest.sln I created to write this article. Furthermore, there is a version using an assembly repository (directory) which allows compiling and testing without having an Interop-dll on your machine.
Credits
I would like to give credits to John Skeet (@jonskeet) for mentioning “embedded PIAs”. Also to MSDN, where I grabbed parts of the code example. In addition to this StackOverflow question. Furthermore, to Dan McClain (@_danmcclain) who wrote the code to set a document property. Last but not least to my employer who allows me to work with interesting technology.


I’ve installed PIA redist but it doesn’t have the microsoft.office.interop.excel included so I don’t know what more to do.
Note: I don’t have installed any office version because I don’t use it in any time
Hi Nestor. It is possible that you need to have at least one version of Microsoft Office installed on your developer machine. I cannot say if it is required since I always had one on my machine.
On one hand it might be frustrating to need a Microsoft Office installation. But on the other hand I am sure you want to test your application during development. Therefore I would suggest to install it on your developer machine.
Hi I’m getting this error
Retrieving the COM class factory for component with
CLSID {00024500-0000-0000-C000-000000000046} failed due to the following
error: 80070005 Access is denied. (Exception from HRESULT: 0x80070005
(E_ACCESSDENIED)). Any clue?
Hi Roberto, Thank you for being interested in my approach. I haven’t faced this error yet. Can you please describe your problem in more detail? If you would like to get a fast and useful answer, try posting a detailed and concret question on http://www.stackoverflow.com.
Hi, Roberto. I got the exact same error as you did. I was able to overcome it by following these instructions: http://support.microsoft.com/kb/899965. Best of luck!
Hi, I would like to know if you tried your solution on a server without having any office installation, thanks
In my case the release of all Office Interop references was a hard one. Calls like above _worksheet = _workbook.Sheets.Add() returns a worksheet ok, but it secretly creates a new instance of the .Sheets collection without our explicit reference. The solution, it seems, is to create explcit reference to anything you expect will be objects implicitly created.
A test that ALL references are disposed the Excel.exe process should terminate as user closes Excel while your application is still upp an running.
And how about Microsoft Office Object Library? I’m using Microsoft.Office.Interop.PowerPoint 14.0 in my project (because I need to support both Office 2010 and 2013), but some methods from Interop needs types from Microsfot.Office.Core nasmepace, which is part of Microsoft Office Object Library. Unfortunately, I see only Microsoft Office 15.0 Core Library in Reference Manager -> COM. How can I add v14 of this library to support both Office 2010 and Office 2013? Thanks
At this point it seems crazy that Microsoft doesn’t make the appropriate DLLs available as a NuGet package to make life easier on the developers who are supporting their platform.