
Welcome to this FREE Blazor Crash Course. In this course, we will be going to build an actual Blazor WebAssembly application based on .NET 5 step-by-step so that you can follow along and code along yourself.
We’ll be going through the fundamentals of Blazor so that after this crash course, you can implement a fully functional web app yourself.
Table of Content
- The FREE Blazor Crash Course – Getting Started (this article)
- Blazor Form Component & Validation
- Blazor API Handling
- Blazor Modal Dialog Component
- Blazor CSS Handling
- Static Images
- Building a Dashboard
- End-to-End Testing using SpecFlow
I highly recommend that you build the application yourself instead of only watching the videos to make the most out of this crash course.
Are you new to Blazor and want to build your first Blazor application? Maybe you already know a few things about Blazor but wish to learn more and take your knowledge to the next level?
If you are completely new to Blazor and want to find out how it works and if it is something you should consider learning, check out my Introduction to Blazor video. You’ll learn about what Blazor is and how powerful its component model is.
If you heard about Blazor before and are interested in creating an actual app using Blazor, this free Blazor course is perfect for you.
However, you should be familiar with C# in general.
In this crash course, we’ll be building a Blazor WebAssembly web application. It means that the application will be running natively in the browser. Blazor Server is another hosting model that we are not going to cover in this crash course.
If you don’t know about the differences between Blazor Server and Blazor WebAssembly, check out the Introduction to Blazor Server.
App Demo
Now let’s take a look at the application we’re going to build. Welcome to FinanceMentor. FinanceMentor is a simple income and expense tracker for personal use.
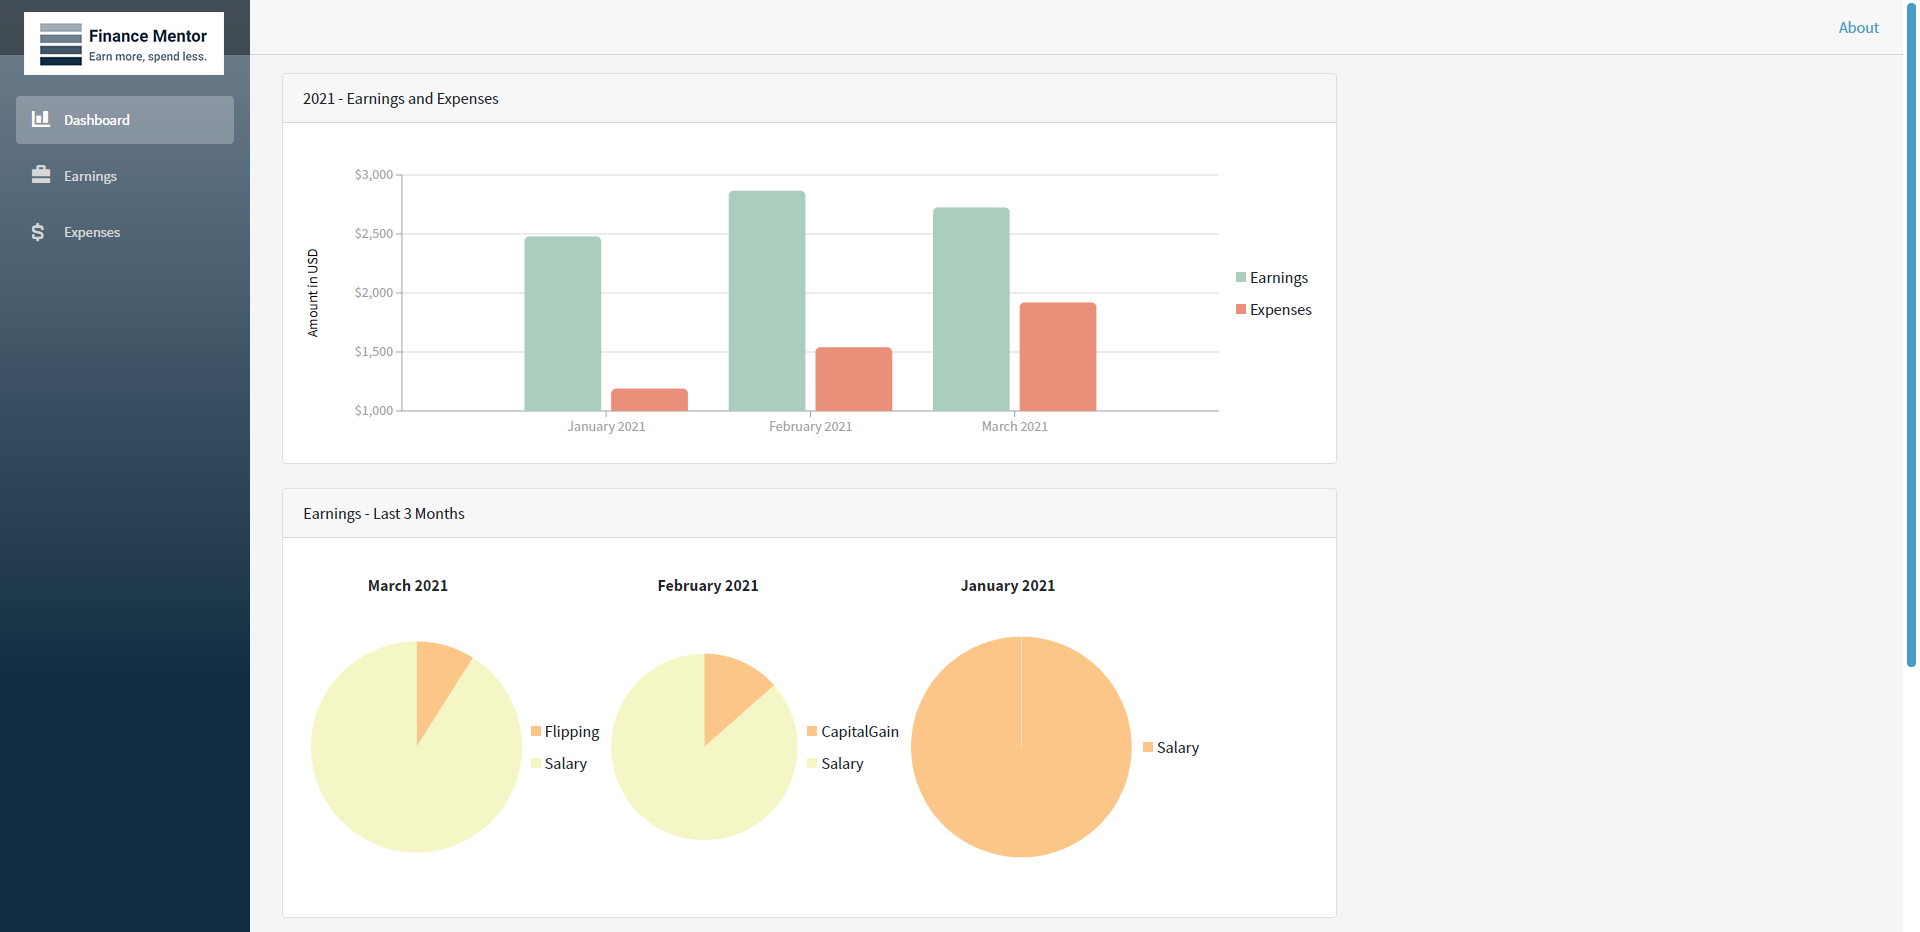
FinanceMentor Dashboard
At the top of the Dashboard, we see a chart of our earnings and expenses in the current year. Below, we see monthly charts with more details about the category of each expense or earning.
We have a menu on the left where we can navigate to the Earnings page. On the earnings page, we see a detailed list of all the earnings. On the right side, we have a form that we can use to add additional data.
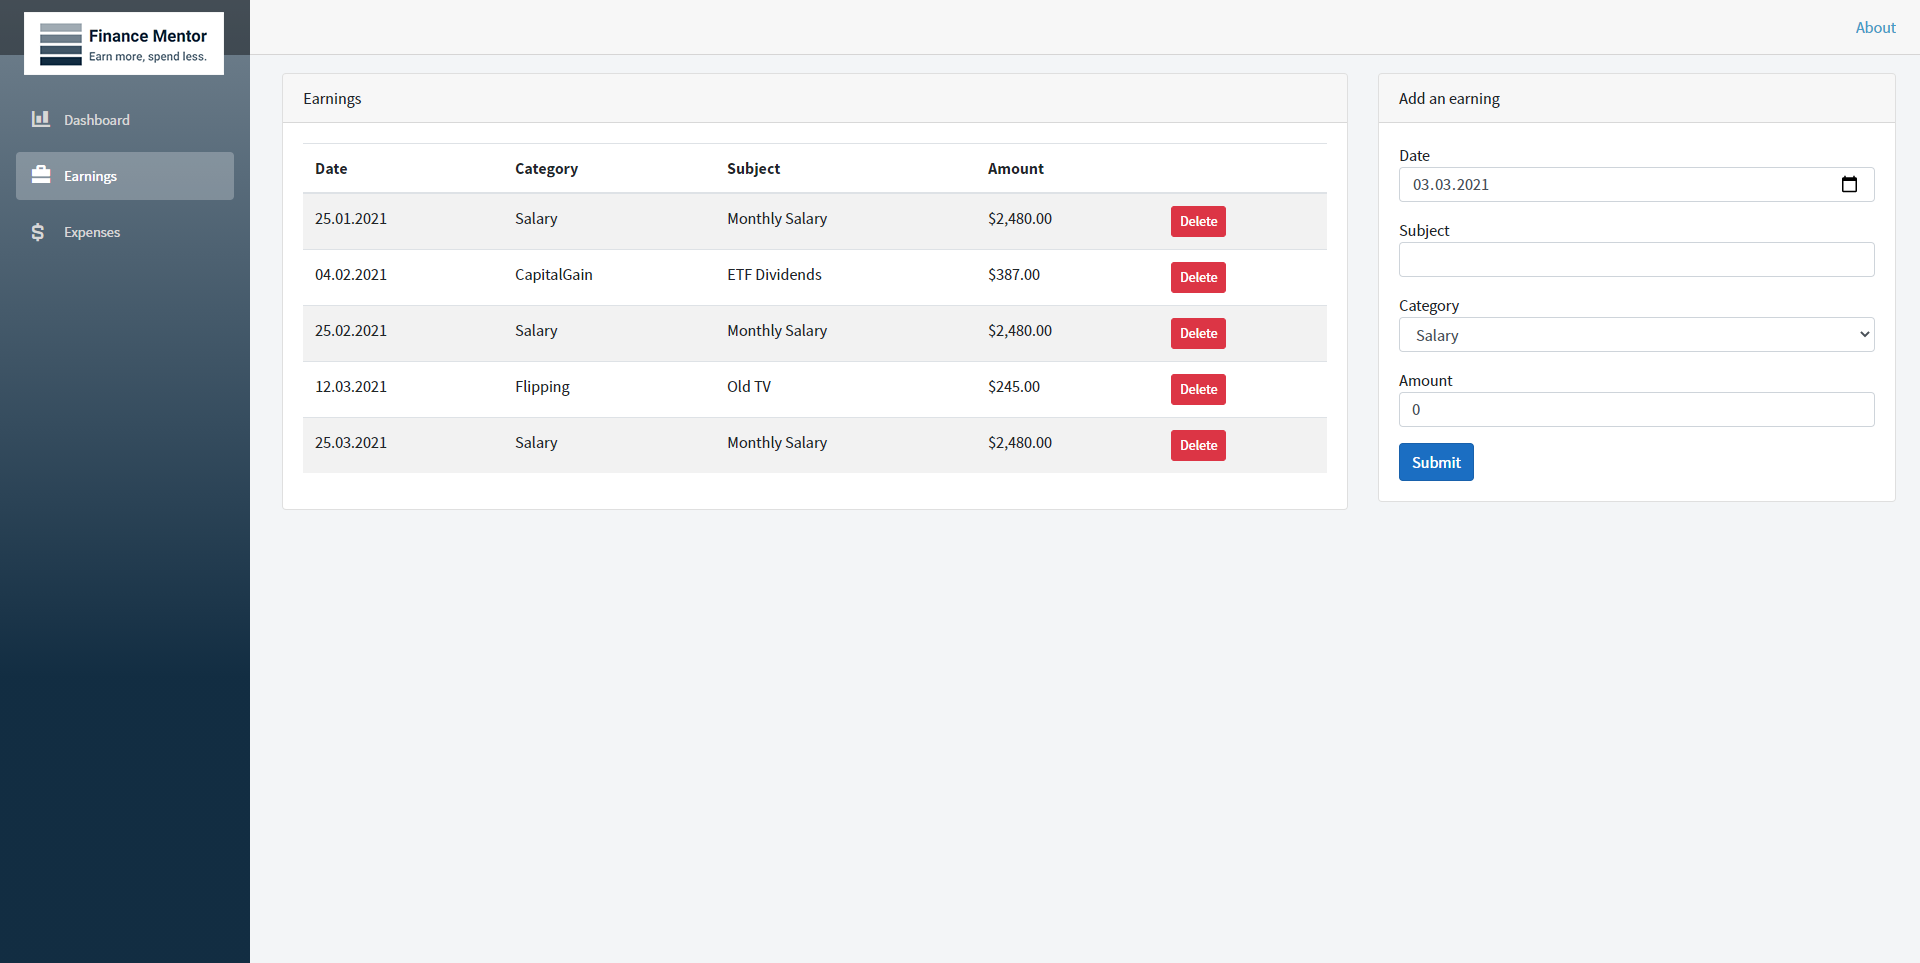
FinanceMentor – Earnings
When I hit the Submit button, we also see that we have basic validation on the form input. Let’s fix my mistake and add an entry. After submitting, we see a new row in the list on the left.
Let’s head back to the Dashboard and check if the new entry has changed anything. As we can see, the current month’s chart now contains a freelancing category with the amount we filled in before.
Let’s check out the last entry in the main menu, where we have almost the same features on the expenses side as we explored before with the earnings.
We can also remove existing entries using the delete button. A click on the delete button opens a modal dialog asking for confirmation.
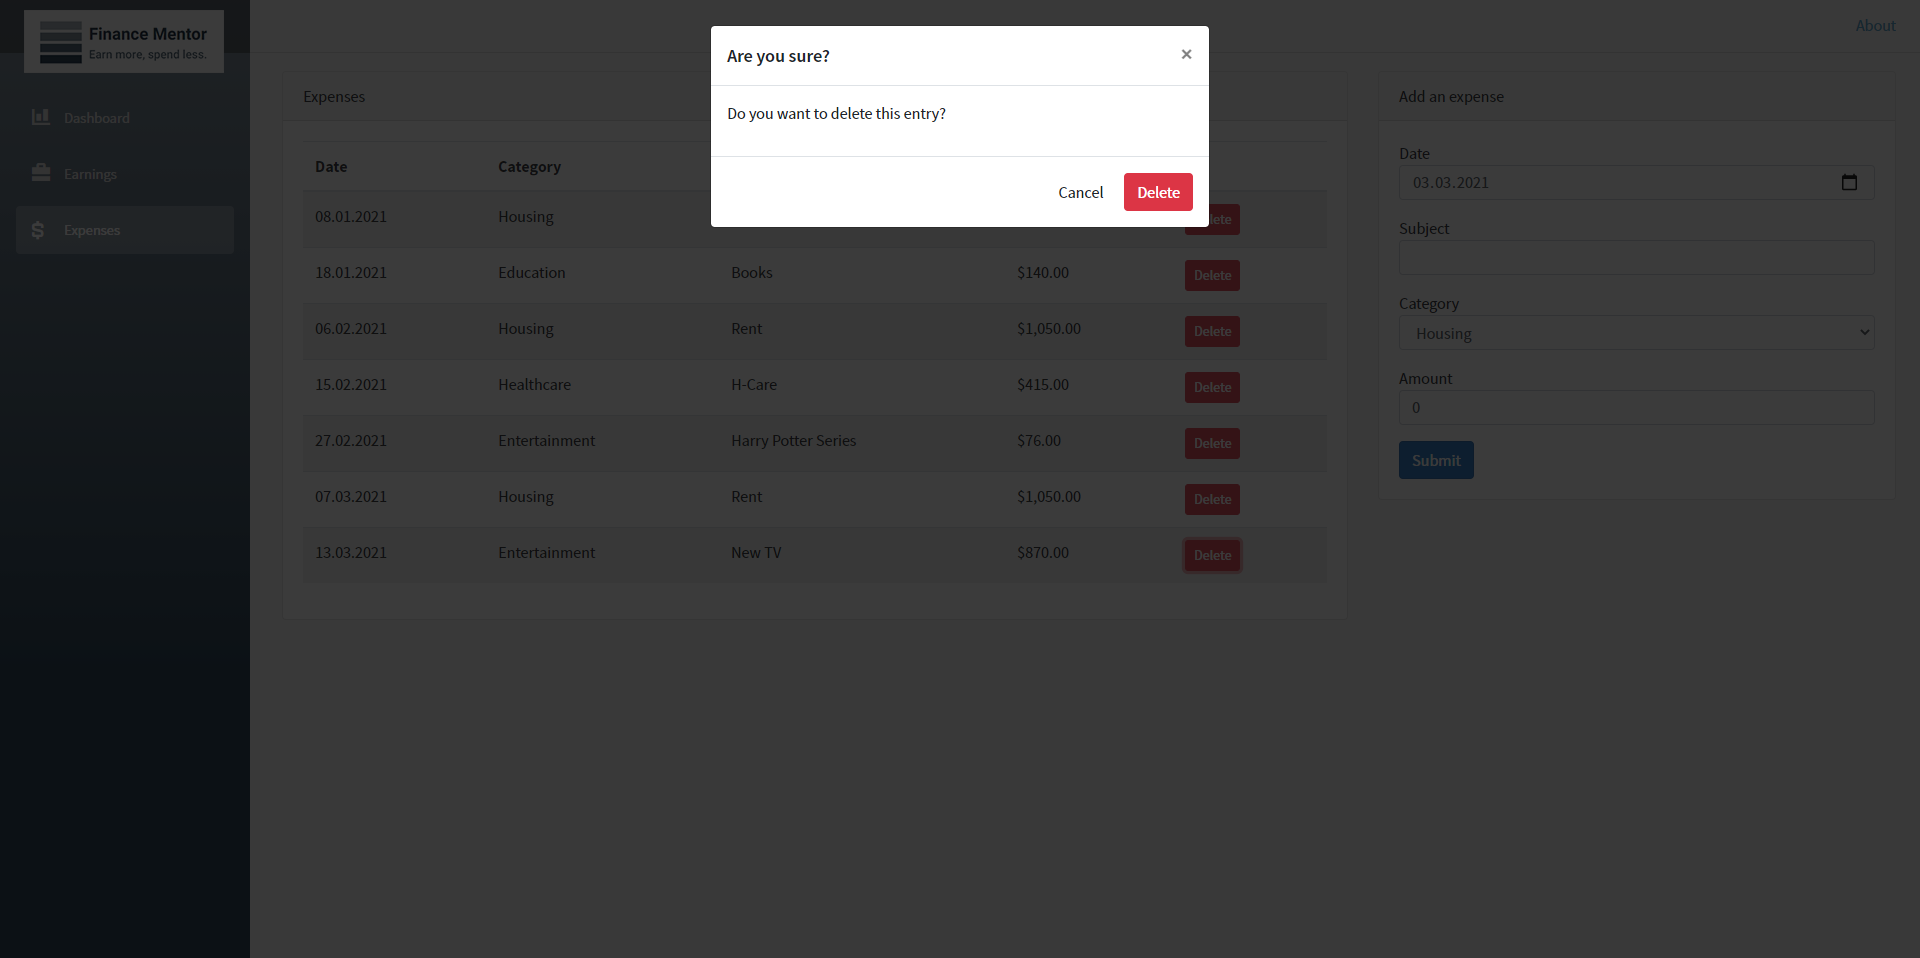
FinanceMentor – Delete
Most user interface elements are part of the widely used Bootstrap user interface framework. Bootstrap is part of the default Blazor project template. We use another UI library for the charts and the modal dialog that we will learn about in future videos of this series.
That’s the current state of the application we’re going to build step-by-step in this Blazor crash course. If you have any feature requests or other questions, write them in the comments. I read the comments and implement additional features based on your feedback during the video series.
If you haven’t already – this would be the perfect time to hit the subscribe button so you don’t miss future videos.
Project Setup
Now let’s finally open Visual Studio and start our project by creating a new project based on the default Blazor WebAssembly template.
Before you start, make sure to update Visual Studio 2019 to the latest version and install the .NET 5 SDK.
Within Visual Studio 2019, we get started by clicking on the Create a new project button. In the project creation wizard, we select the Blazor App template and click next.
Now we need to choose a name for the project and set the location on the disk. We go with FinanceMentor for the project name, and I create it in my default Git path. Don’t change the solution name and click on Create.
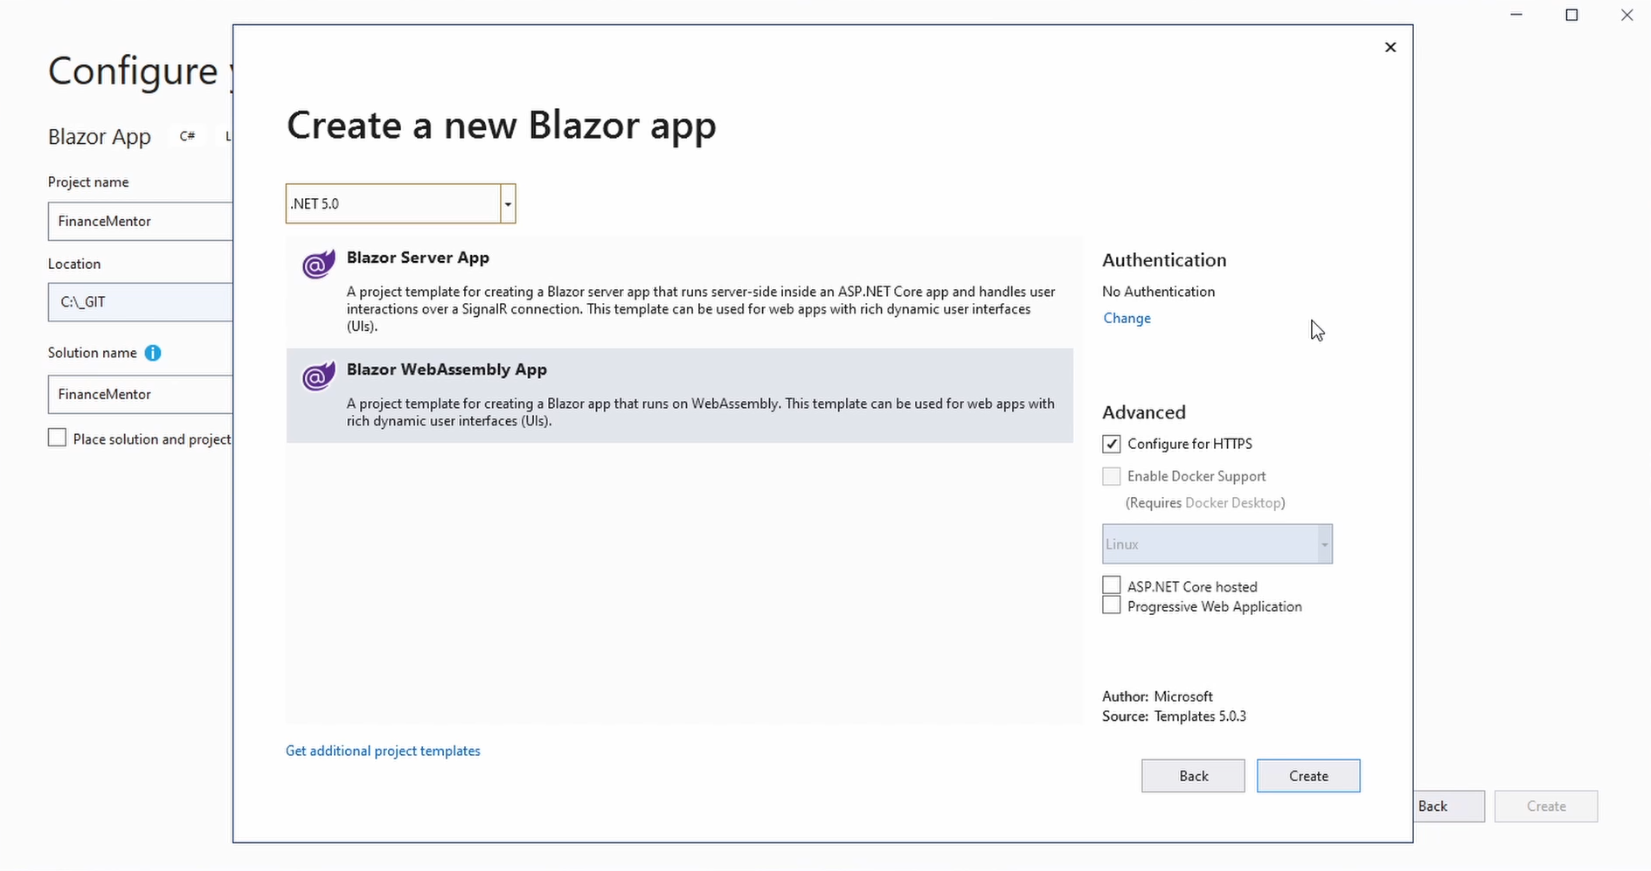
Blazor WebAssembly Project Creation
Within the Create a new Blazor app dialog, we select Blazor WebAssembly App and make sure that .NET 5.0 is selected as the target framework. We don’t change anything in the Authentication section.
In the Advanced section, we check ASP.NET Core hosted. This option will generate a backend application for the Blazor WebAssembly client application.
We click on Create and wait for the project to be created and opened by Visual Studio.
First Project Start
Although it is tempting to start working on the code right away, let’s first build and start the application to see how the web application currently looks.
Blazor WebAssembly App Template – Home
As we can see, we have a classic two-column layout with a menu on the left and the content on the right. We have the name of the application in the menu’s header, and we have three sections within the menu.
The home page has static content. Let’s click on the Counter menu item. Here we have a more dynamic example. If we click on the Click me button, the counter increases.
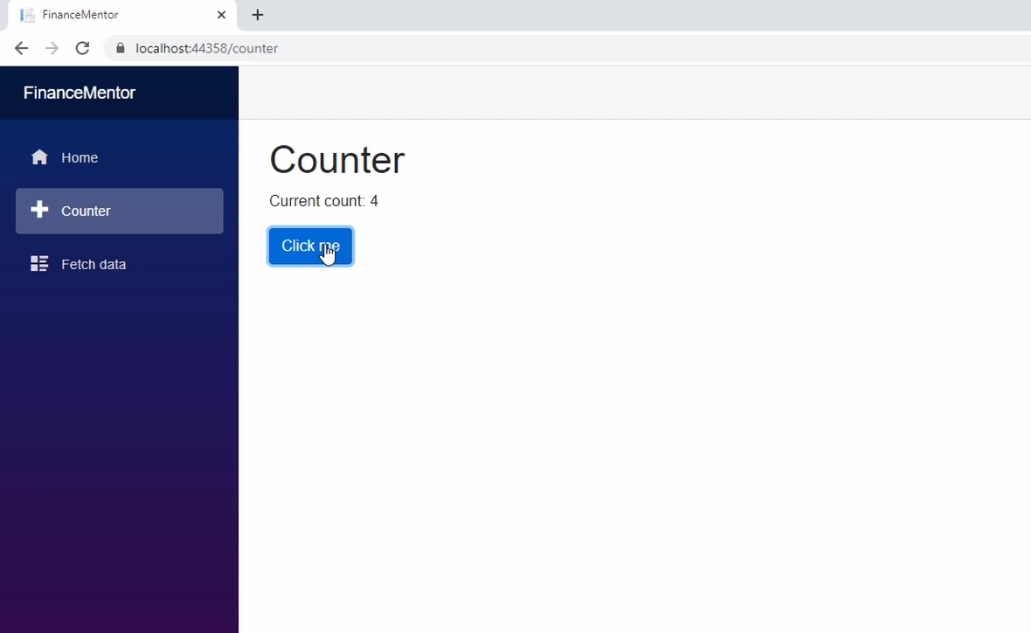
Blazor WebAssembly App Template – Counter
When we click on the Fetch data menu item, we get a data table with forecasted weather information. This page might not look any different from the static home page, but it is. The data displayed on this page gets generated in the backend and accessed through an API call. Don’t worry; we’ll talk about that later in this course.
Project template artifacts
Back in Visual Studio, it’s time to look at the artifacts generated by the Blazor WebAssembly App project template.
In the Solution Explorer we see three projects. The Client project contains the Blazor WebAssembly application. The Server project contains an ASP.NET Core WebAPI project and the Shared project is a class library that contains code that is shared between the two applications.
If you did not check ASP.NET Core hosted while creating the solution, you would only see a single client project.
In this video, we’re only going to explore the Blazor WebAssembly client project. The focus of this crash course is to learn about Blazor, and we’ll talk about the backend as soon as it’s needed to implement the features for the FinanceMentor application.
Let’s start with the Program.cs file.
public class Program
{
    public static async Task Main(string[] args)
    {
        var builder = WebAssemblyHostBuilder.CreateDefault(args);
        builder.RootComponents.Add<App>("#app");

        builder.Services.AddScoped(sp => new HttpClient { BaseAddress = new Uri(builder.HostEnvironment.BaseAddress) });

        await builder.Build().RunAsync();
    }
}
Like any other .NET Core-based application, there has to be a public static Main method. The setup for a Blazor WebAssembly app is simple. We use the WebAssemblyHostBuilder factory to create a builder. Next, we add the root component called App to the builder. To start the application, we call builder.Build().RunAsync().
I skipped line 20, where we add a scoped services to the dependency injection container. In this case, we register an instance of the HttpClient initialized with the correct backend URI. We don’t need to worry about it right now.
Next, let’s look at the App.razor file.
<Router AppAssembly="@typeof(Program).Assembly" PreferExactMatches="@true">
    <Found Context="routeData">
        <RouteView RouteData="@routeData" DefaultLayout="@typeof(MainLayout)" />
    </Found>
    <NotFound>
        <LayoutView Layout="@typeof(MainLayout)">
            <p>Sorry, there's nothing at this address.</p>
        </LayoutView>
    </NotFound>
</Router>
The App.razor file contains the root component of the application, which is referenced in the Program.cs. It contains a Router definition. Right now, we don’t need to know much more than that the default layout is the MainLayout component.
Let’s take a look at the MainLayout.razor file.
@inherits LayoutComponentBase

<div class="page">
    <div class="sidebar">
        <NavMenu />
    </div>

    <div class="main">
        <div class="top-row px-4">
            <a href="http://blazor.net" target="_blank" class="ml-md-auto">About</a>
        </div>

        <div class="content px-4">
            @Body
        </div>
    </div>
</div>
The MainLayout component defines the two-column layout we saw when we started the application. We have the NavMenu component containing the menu and the div with the main CSS class applied that contains the page’s content.
Let’s take a look at the NavMenu.razor file.
<div class="top-row pl-4 navbar navbar-dark">
    <a class="navbar-brand" href="">FinanceMentor</a>
    <button class="navbar-toggler" @onclick="ToggleNavMenu">
        <span class="navbar-toggler-icon"></span>
    </button>
</div>

<div class="@NavMenuCssClass" @onclick="ToggleNavMenu">
    <ul class="nav flex-column">
        <li class="nav-item px-3">
            <NavLink class="nav-link" href="" Match="NavLinkMatch.All">
                <span class="oi oi-home" aria-hidden="true"></span> Home
            </NavLink>
        </li>
        <li class="nav-item px-3">
            <NavLink class="nav-link" href="counter">
                <span class="oi oi-plus" aria-hidden="true"></span> Counter
            </NavLink>
        </li>
        <li class="nav-item px-3">
            <NavLink class="nav-link" href="fetchdata">
                <span class="oi oi-list-rich" aria-hidden="true"></span> Fetch data
            </NavLink>
        </li>
    </ul>
</div>

@code {
    private bool collapseNavMenu = true;

    private string NavMenuCssClass => collapseNavMenu ? "collapse" : null;

    private void ToggleNavMenu()
    {
        collapseNavMenu = !collapseNavMenu;
    }
}
The NavMenu component contains the title of the application shown in the top left corner of the application and the menu with the three menu items Home, Counter, and Fetch data.
Let’s take a look at the Index.razor file.
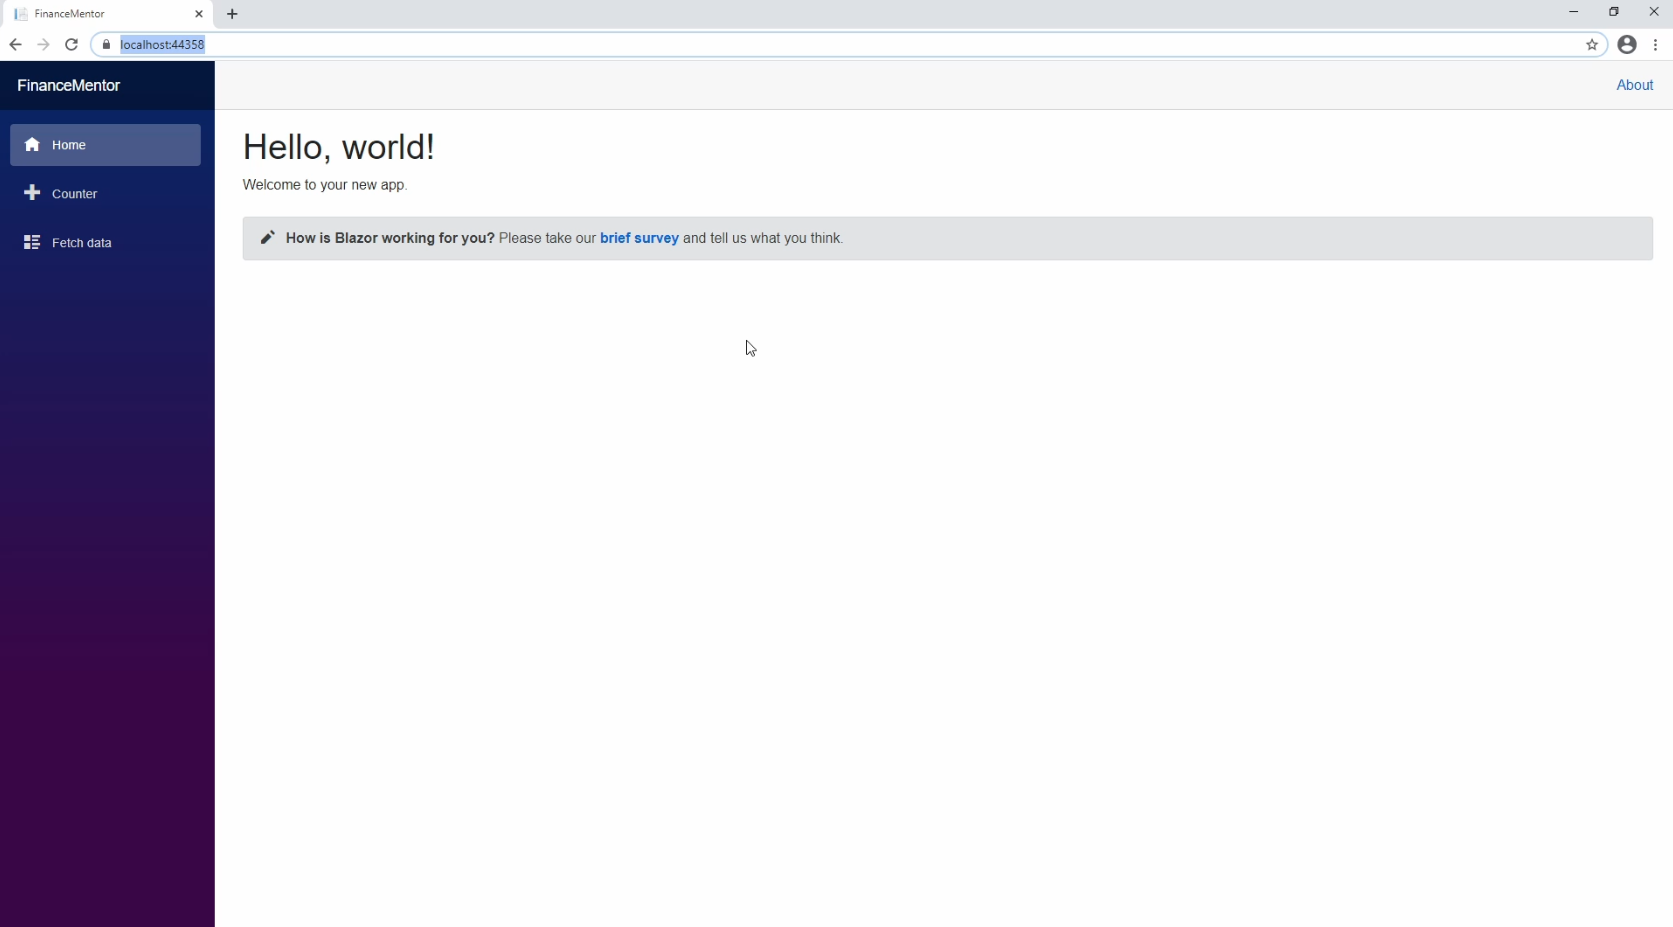
@page "/"

<h1>Hello, world!</h1>

Welcome to your new app.

<SurveyPrompt Title="How is Blazor working for you?" />
The Index component uses the @page directive on line 1. Using the @page directive makes the component a page. It tells the router that if the users access the provided URI this page must be loaded. In this case, the route is defined by a slash making the Index component the default page for the application.
Below the standard HTML content of the Index page, we have a reference to the SurveyPrompt component. Isn’t it great how simple we are able to use a different Blazor component?
Interestingly, we can provide an argument to the SurveyPromt component by using standard HTML syntax using a custom Title property.
Let’s take a look at the SurveyPrompt.razor file.
<div class="alert alert-secondary mt-4" role="alert">
    <span class="oi oi-pencil mr-2" aria-hidden="true"></span>
    <strong>@Title</strong>

    <span class="text-nowrap">
        Please take our
        <a target="_blank" class="font-weight-bold" href="https://go.microsoft.com/fwlink/?linkid=2137916">brief survey</a>
    </span>
    and tell us what you think.
</div>

@code {
    // Demonstrates how a parent component can supply parameters
    [Parameter]
    public string Title { get; set; }
}
The SurveyPrompt component we referenced in the Index page also contains standard HTML. In the Blazor specific @code section, we have C# code that can be used within the HTML template.
Blazor makes use of a component programming model comparable to React.
There is a public string title property which is used on line 3 in the HTML template. The Parameter attribute on line 14 makes the property available when we reference it in another component.
Let’s take a look at the Counter.razor file.
@page "/counter"

<h1>Counter</h1>

<p>Current count: @currentCount</p>

<button class="btn btn-primary" @onclick="IncrementCount">Click me</button>

@code {
    private int currentCount = 0;

    private void IncrementCount()
    {
        currentCount++;
    }
}
The counter component is also defined as a page using the @page directive. It can be accessed using the /counter path. Now let’s take a closer look at the implemenation of the component.
We have a private int currentCount variable initialized with 0 that is used on line 5 in the HTML template. We also have a IncrementCounter method on line 12 that is used on line 7.
As you can see, it’s very simple to attach a C# method to an HTML button by using the @onclick attribute and providing the name of the method as an argument.
Whenever we want to do something Blazor specific, we use the @ symbol followed by a directive or an attribute name.
Do you see how few code lines we need and how tidy the definition of this component is? It’s one of the strengths of Blazor. It allows us to code components efficiently.
Let’s take a look at the FetchData.razor file.
@page "/fetchdata"
@using FinanceMentor.Shared
@inject HttpClient Http

<h1>Weather forecast</h1>

<p>This component demonstrates fetching data from the server.</p>

@if (forecasts == null)
{
    <p><em>Loading...</em></p>
}
else
{
    <table class="table">
        <thead>
            <tr>
                <th>Date</th>
                <th>Temp. (C)</th>
                <th>Temp. (F)</th>
                <th>Summary</th>
            </tr>
        </thead>
        <tbody>
            @foreach (var forecast in forecasts)
            {
                <tr>
                    <td>@forecast.Date.ToShortDateString()</td>
                    <td>@forecast.TemperatureC</td>
                    <td>@forecast.TemperatureF</td>
                    <td>@forecast.Summary</td>
                </tr>
            }
        </tbody>
    </table>
}

@code {
    private WeatherForecast[] forecasts;

    protected override async Task OnInitializedAsync()
    {
        forecasts = await Http.GetFromJsonAsync<WeatherForecast[]>("WeatherForecast");
    }

}
The FetchData component also uses the @page directive, which makes this component a page.
On line 2 we see a using statement for the first time. It allows us to import classes from different namespaces to use within this component.
On line 3, we use the @inject directive that tells Blazor that we request an instance of the HttpClient type from the dependency injection container. We can access it using the Http identifier defined after the requested type.
The template uses a few more Blazor features. First, we have an if-else on line 9, and a foreach on line 25. Both constructs exactly work as you know them from other C# application types. Blazor offers a very clean syntax to use C# code within the template section to define our component’s appearance.
In the code section starting on line 38, we have a private field that contains the weather data. On line 41, we use a lifecycle method called OnInitializedAsync to load the data from our backend API using the Http client injected in the FetchData component.
As you can see, this component is doing a little more than the Counter component before, but it still uses simple syntax and only a few code lines.
We’ll discuss API handling in a future video of this crash course in more detail.
Last but not least, let’s take a look at the wwwroot folder.
The wwwroot folder contains the static artifacts like the Index.html file, the CSS files we use, and if your application uses JavaScript files, they would also be within this folder. We don’t go deeper into those files right now because those files don’t contain anything Blazor-specific.
Summary
This video is the first part of the Blazor Crash course. Congratulations! You learned about how to create your first Blazor WebAssembly application hosted by a .NET Core WebAPI backend.
We also looked at the artifacts generated by the Blazor WebAssembly project template and how the application looks in the browser. We also learned the fundamentals of the Blazor component model.
What’s next?
In the following video of this series, we’ll be starting to change the code and implement new components.
Tell me in the comments what you would like to learn in a future video of this series. I’ll do my best to include it as we go through building this application together.
Thanks for watching, don’t forget to subscribe, bookmark the playlist, so you don’t miss the next part of this series and see you in the next video.


