
This video is part of The FREE Blazor Crash Course. In this crash course, we build an actual Blazor WebAssembly application based on .NET 5. In this video, we will implement a new page and a form component for our Blazor application.
Table of Content
- The FREE Blazor Crash Course – Getting Started
- Blazor Form Component & Validation (this article)
- Blazor API Handling
- Blazor Modal Dialog Component
- Blazor CSS Handling
- Static Images
- Building a Dashboard
- End-to-End Testing using SpecFlow
If you haven’t watched the first episode of this FREE Blazor Crash course, you might want to do so to get the most out of it.
Let’s take a look at what we’re going to build.
The Completed Form Component (Demo)
In the completed demo application, we have an Earnings page with a table on the left and the form on the right. In this video, we’re going to implement the page, the menu item, and the form. We’re not going to build the table yet.
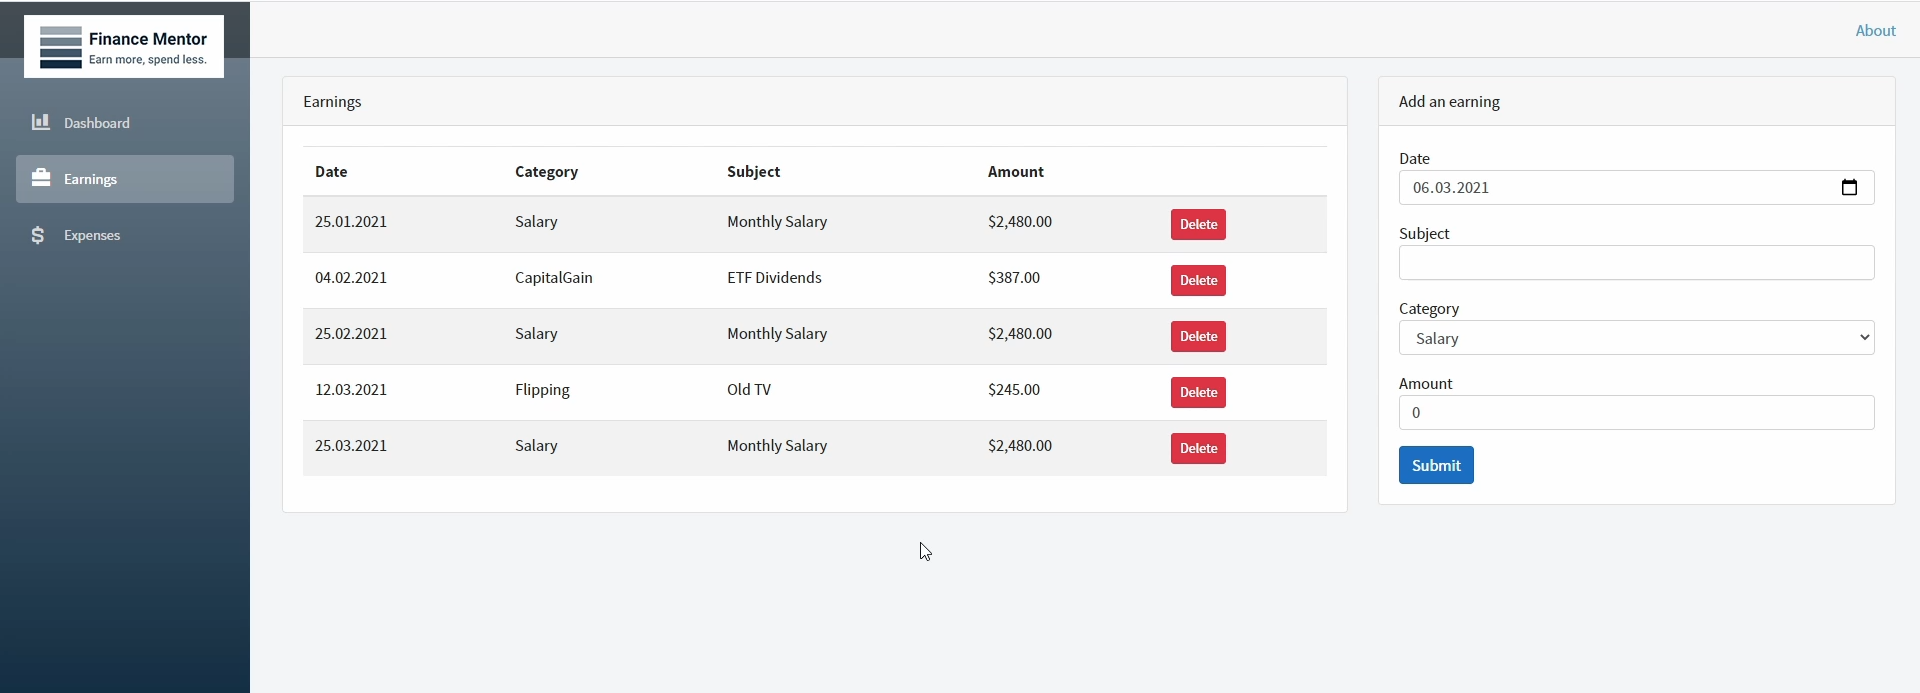
Demo App (Completed): Form Component
If we click on the menu item, we navigate to the page. If we click on the submit button in the form, we display text on the page. We’re going to implement API access in another video of this FREE Blazor Crash course.
Additionally, we implement basic input validation for our form. As you can see, if I click on the submit button without entering any information, you’ll see an error above the form letting the user know that the subject field is required.
Create a New Blazor Component
Now, let’s jump into Visual Studio, and let’s create the Earnings page.
In the solution explorer, right-click on the Pages folder, select the Add menu and click on “Razor component” in the submenu. We name the component Earnings.razor.
<h3>Earnings</h3>

@code {

}
The generated component based on the Razor component template contains an h3 tag with the name of the component and an empty @code block.
Turn a Blazor Component into a Page
To turn the component into a page, we add the @page directive above the template. We define the /earnings route to access the page. The @page directive registers the component as a routable page.
@page "/earnings"

<h3>Earnings</h3>

@code {

}
Add a Menu Item
Next, we open the NavMenu component. Here, we have the three existing menu items. We copy the last item and change the href attribute to match the route we defined in the Earnings page before.
We also change the text visible on the website to match the name of our page. Last but now least, we change the icon to make it fit the page.
<div class="@NavMenuCssClass" @onclick="ToggleNavMenu">
    <ul class="nav flex-column">
        <li class="nav-item px-3">
            <NavLink class="nav-link" href="" Match="NavLinkMatch.All">
                <span class="oi oi-home" aria-hidden="true"></span> Home
            </NavLink>
        </li>
        <li class="nav-item px-3">
            <NavLink class="nav-link" href="counter">
                <span class="oi oi-plus" aria-hidden="true"></span> Counter
            </NavLink>
        </li>
        <li class="nav-item px-3">
            <NavLink class="nav-link" href="fetchdata">
                <span class="oi oi-list-rich" aria-hidden="true"></span> Fetch data
            </NavLink>
        </li>
        <!-- new Menu item here -->
        <li class="nav-item px-3">
            <NavLink class="nav-link" href="earnings">
                <span class="oi oi-briefcase" aria-hidden="true"></span> Earnings
            </NavLink>
        </li>
    </ul>
</div>
Now let’s see how the application looks in the browser. Let’s run the application.
Test the Page
As we can see, there is another menu item at the bottom of the list within the navigation. If we click on the Earnings menu item, we navigate the earnings route, as you can see in the browser’s address line. Also, we see the content of our Earnings page in the content section of the application.
Create the Blazor Form Component
Back in Visual Studio, it’s time to create the form component and add it to the page.
Before we create the new component, let’s add a components folder to the application. We right-click on the client project and add a new folder. We name the folder Components.
Next, we right-click on the Components folder and choose to create another Razor component. We name the component EarningForm.
Implement the Blazor Form Component
Now let’s replace the generated template with the following card structure.
<div class="card">
    <div class="card-header">
        Add an earning
    </div>
    <div class="card-body">
    </div>
</div>
In the body section of the card, we use the EditForm component. It’s a default component from the “Microsoft.AspNetCore.Components.Forms” namespace.
The EditModel allows us to connect an HTML form with an object in the application. It has two properties. The Model property accepts a reference to a model, and the OnValidSubmit property accepts a callback method that is called when a user submits a valid form.
<div class="card">
    <div class="card-header">
        Add an earning
    </div>
    <div class="card-body">
        <EditForm Model="@earning" OnValidSubmit="@HandleValidSubmit">
        </EditForm>
    </div>
</div>
We need to create a model class to hold the data for our form. Let’s create a new class in the Components folder called EarningModel.
Because we want to focus on Blazor development in this crash course, I copy & paste the content of this model class.
public class EarningModel
    {
        public DateTime Date { get; set; }

        public string Subject { get; set; }

        public EarningCategory Category { get; set; }

        public decimal Amount { get; set; }
    }
The EarningModel defines a DateTime property called Date, a string property called Subject, a Category of a custom enum type, and a decimal property called Amount.
Before we can continue our work on the EarningForm component, we also need to implement the EarningCategory enum in the Shared project. Let’s quickly add this code as well.
public enum EarningCategory
{
    Salary,
    CapitalGain,
    Freelancing,
    Coaching,
    Flipping,
    Gift,
}
Back in the EarningForm component, we create a field of the EarningModel type in the code section. We initialize the Date property with the current date.
Next, we define a public void HandleValidSubmit method. This method is called when a user submits a valid form. As I said earlier, we’re not calling an API right now but want to show a text on the component.
We create a string field called success and initialize it as an empty string. Within the HandleValidSubmit method, we set the string to “success”. To make the variable visible in the template, we add it below the EditForm tag.
@using FinanceMentor.Shared;

<div class="card">
    <div class="card-header">
        Add an earning
    </div>
    <div class="card-body">
        <EditForm Model="@earning" OnValidSubmit="@HandleValidSubmit">
            <!-- Form Fields -->
        </EditForm>
        <div>@success</div>
    </div>
</div>

@code {
    private EarningModel earning = new EarningModel { Date = DateTime.Today };
    private string success = "";

    public void HandleValidSubmit()
    {
        success = "success";
    }
}
Now, we are ready to add the form fields to the template. To save us some time, I insert a snippet and take you through the important pieces.
@using FinanceMentor.Shared;

<div class="card">
    <div class="card-header">
        Add an earning
    </div>
    <div class="card-body">
        <EditForm Model="@earning" OnValidSubmit="@HandleValidSubmit">
            <div class="form-group">
                <label for="dateInput">Date</label>
                <InputDate class="form-control" id="dateInput" @bind-Value="earning.Date" />
            </div>
            <div class="form-group">
                <label for="subjectInput">Subject</label>
                <InputText class="form-control" id="subjectInput" @bind-Value="earning.Subject" />
            </div>
            <div class="form-group">
                <label for="categoryInput">Category</label>
                <InputSelect class="form-control" id="categoryInput" @bind-Value="earning.Category">
                    @{
                        foreach (var value in Enum.GetValues(typeof(EarningCategory)))
                        {
                            <option value="@value">@value</option>
                        }
                    }
                </InputSelect>
            </div>
            <div class="form-group">
                <label for="amountInput">Amount</label>
                <InputNumber class="form-control" id="amountInput" @bind-Value="earning.Amount" />
            </div>
            <div>
                <button type="submit" class="btn btn-primary">Submit</button>
            </div>
        </EditForm>
        <div>@success</div>
    </div>
</div>

@code {
    private EarningModel earning = new EarningModel { Date = DateTime.Today };
    private string success = "";

    public void HandleValidSubmit()
    {
        success = "success";
    }
}
For every field, we use a div with the “form-group” CSS class applied. We also have a label that describes the field. Now let’s talk about the Blazor specific part of the form fields.
Blazor offers predefined components to handle HTML input fields. For example, we have the InputDate component that we use to fill the Date property. We bind the value of the HTML input field to the model using the @bind-Value attribute. We provide the field that receives the input value as the value of the attribute. Of course, we have full code completion support.
The other fields work similarly to the InputDate component. Blazor offers an InputText component to handle text fields, an InputSelect component to handle dropdowns, and an InputNumber component to handle numeric input fields. All those components have in common that we can bind the value property to the form model.
We need to do one last thing before we can run the application. We need to import the namespace for the EarningCategory type used for the category field.
At the top of the component, we add a using statement for the “FinanceMentor.Shared” namespace.
Testing the Blazor Form Component
Now save all the files, and let’s start the application to see if we can use the form.
When we navigate to the Earnings page, there is no form. Well, something went wrong here, or isn’t it? Let’s head back to Visual Studio.
Open the Earnings component.
@page "/earnings"
<h3>Earnings</h3>

@code {

}
As we can see, we do not include the EarningForm component in the template. Let’s fix that.
Below the h3 tag, we insert a tag with the name of the EarningForm component. Again, we have code completion that helps us find the correct component. The fully qualified name of the component makes the template hard to read. Let’s import the namespace instead.
At the top of the Earnings component, we add a using statement for the FinanceMentor.Client.Components namespace. It allows us to remove the namespace in front of the EarningForm component tag.
@page "/earnings"
@using FinanceMentor.Client.Components;

<h3>Earnings</h3>
<EarningForm></EarningForm>

@code {

}
Let’s start the application again.
We navigate to the Earnings component and, this time, we see the form on the screen. Let’s click the Submit button. As soon as we click, the success message appears below the submit button.
Implement Simple Input Validation
That’s great. However, now that we have the form, we want to implement simple input validation. We want to make sure that the user provides the information we need.
First of all, let’s define the validation rules. We open the EarningModel class and add a few attributes to the property definitions.
using FinanceMentor.Shared;
using System;
using System.ComponentModel.DataAnnotations;

namespace FinanceMentor.Client.Components
{
    public class EarningModel
    {
        [Required]
        public DateTime Date { get; set; }

        [Required]
        [StringLength(50)]
        public string Subject { get; set; }

        [Required]
        public EarningCategory Category { get; set; }

        [Required]
        public decimal Amount { get; set; }
    }
}
The properties are decorated with annotations from the System.ComponentModel.DataAnnotations namespace.
We make all four properties required and limit the length of the subject property to 50 characters.
Back in the EarningForm component, we add two predefined components as children for the EditForm component.
@using FinanceMentor.Shared;

<div class="card">
    <div class="card-header">
        Add an earning
    </div>
    <div class="card-body">
        <EditForm Model="@earning" OnValidSubmit="@HandleValidSubmit">
            <DataAnnotationsValidator />
            <ValidationSummary />
            <!-- Form fields removed for simplicity -->
        </EditForm>
        <div>@success</div>
    </div>
</div>

@code {
    private EarningModel earning = new EarningModel { Date = DateTime.Today };
    private string success = "";

    public void HandleValidSubmit()
    {
        success = "success";
    }
}
The DataAnnotationsValidator component tells the EditForm component to respect the data annotations we defined on the model class. The ValidationSummary component outputs the validation errors.
Let’s start the application again.
Once again, we navigate to the Earnings page and press the submit button. This time, we do not see the success message because the form is not in a valid state. Instead, we see the error messages provided by the ValidationSummary component above the form fields.
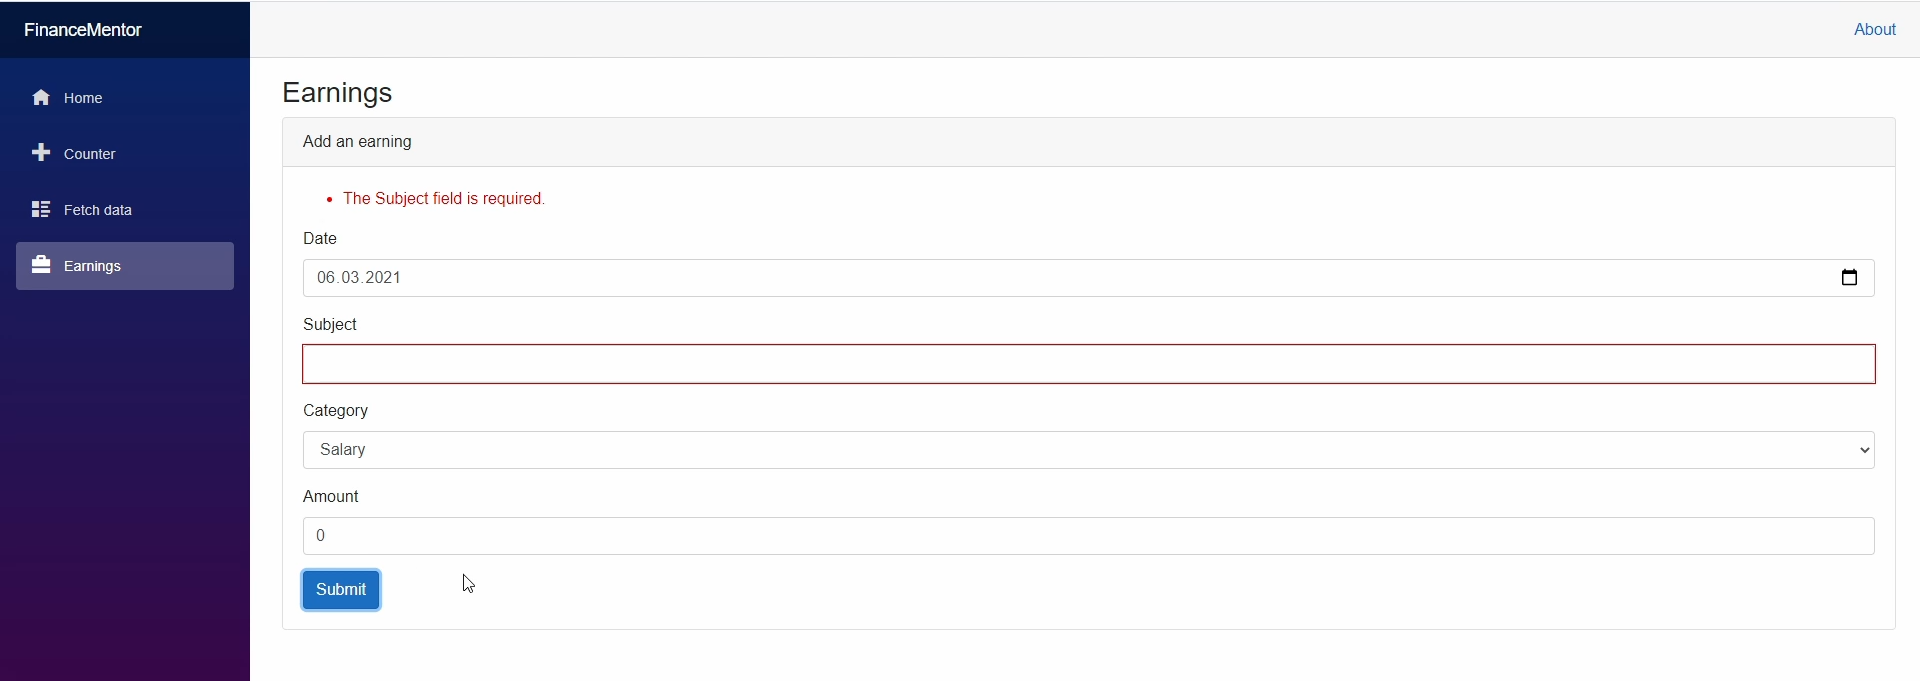
Form Component with Input Validation
We fix the error by providing an input in the subject field and press submit again. This time, the success message appears below the submit button.
Congratulations! You implemented your first Blazor page and your first form component.
Summary
This video is the second part of the Blazor Crash Course. You learned how to create Blazor components and how the @page directive allows you to create a route to the component, effectively making it a page.
We also looked at how we define a form with different input types and how to handle the submit of a form. We also implemented input validation for the form fields.
What’s next?
In the following video of this series, we’ll be discussing and implementing API handling. You’ll learn how to load data from a backend and save information collected in the form we created in this video.
Tell me in the comments what you would like to learn in a future video of this series. I’ll do my best to include it as we go through building this application together.


