
Working on software products as a developer means that we get feature requests and turn them into code. When our job is done, a tester will look at the product and perform manual tests. Ideally, after the test, the feature is completed, and everyone moves on to the next feature.
However, often, the tester finds something that’s not okay. And I don’t talk about minor bugs in the implementation, but it’s the feature itself that doesn’t work as expected in the product’s context. The feature goes back to the product manager, and after a few meetings, it turns out that the feature specification has to be changed, the developer gets another task assigned to work on the same feature again, but this time, do the right things.
Does this sound familiar to you?
Thanks to my friends at SpecFlow for sponsoring the video and this blog post. 🙏
Behavior-driven development (BDD) tries to solve this problem. Let’s learn about BDD and how SpecFlow can help to improve software quality.
Table of Content
- What is BDD?
- What is SpecFlow?
- Getting Started with SpecFlow
- Creating the Test Project
- Feature Files using Given/When/Then syntax
- The Example Code
- Implementing the Feature File
- Implementing the Step Definition File
- Adding Additional Scenarios
- Tips & Tricks
- Advanced Use Cases
- Additional SpecFlow Tools
I’m a Software Engineer with more than ten years of experience with the .NET platform. I was part of a big software refactoring project when I came in touch with BDD and SpecFlow for the first time. It changed how I think about the software development process, and it provided me with a helpful test automation tool for my developer toolbelt.
What is BDD?
Behavior Driven Development (BDD) is an agile software development practice that encourages collaboration between everyone involved in the software development process: developers, testers, and business representatives such as product owners or business analysts.
BDD aims to create a shared understanding of how an application should behave by discovering new features based on concrete examples. Key examples are then formalized with natural language following a Given/When/Then structure.
Source: https://specflow.org/bdd/
So it basically tells people to work together when creating software products. What’s unique about BDD is that the feature’s specification is also used as its verification and can be automated and executed whenever the code changes.
That’s why we also speak about living documentation.
The goal of BDD is to write feature specifications in a way that business people can understand them, and software people can automate their execution in the development process to run them continuously throughout the project.
If you want to learn more details about BDD and its advantages, check out https://specflow.org/bdd/.
What is SpecFlow?
SpecFlow is an open-source framework for Behavior Driven Development that provides a mechanism to turn specifications into executable code that can be used to create automated tests.
With over 10 million downloads on NuGet, SpecFlow is used by small and large software development teams around the world.
SpecFlow uses the Gherkin Given/When/Then syntax used in feature files and turns them into executable code, also known as step definitions.
Getting Started With SpecFlow
That’s all great, but how do we use SpecFlow in our projects? Let’s open Visual Studio, and let’s discover SpecFlow together.
First of all, SpecFlow offers an extension for Visual Studio. I’m a Visual Studio user, but there is a SpecFlow plugin available for JetBrains Rider too.
SpecFlow has the following extensions:
Let’s install the SpecFlow extension for Visual Studio 2019. Open the Extensions menu and click on Manage Extensions.
In the dialog, search for SpecFlow and install the SpecFlow for Visual Studio 2019 extension with more than 160 thousand installations.
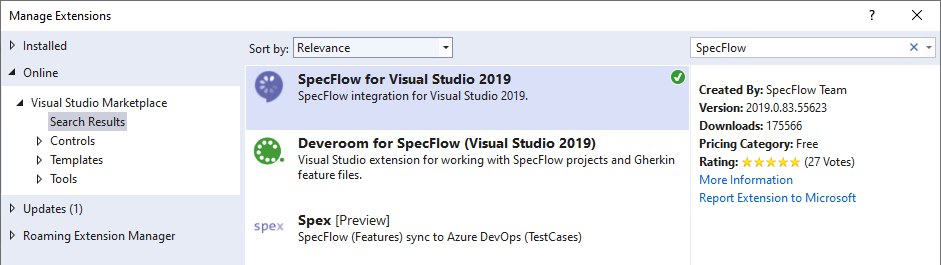
SpecFlow Extension for Visual Studio 2019
As with the SpecFlow core, the Visual Studio extensions are also open source. Fun fact: In 2018, I made a small contribution myself.
After the installation of the extension, we need to restart Visual Studio.
Creating the Test Project
Next, let’s take a look at the solution. We have a .NET 5 class library project with a few classes. Let’s add a test project to the solution.
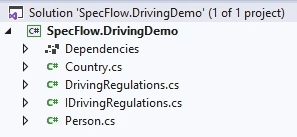
SpecFlow Demo application: Solution Explorer with Demo Project
With the SpecFlow extension, we also installed a project template to set up the test project conveniently. Let’s search for the template by entering SpecFlow in the search box.
We select the SpecFlow Project template and click on the Next button. We use SpecFlow.DrivingDemo.Test as the project name and click on the Create button.
In the Create a new SpecFlow project dialog, we can choose from the installed frameworks and select .NET 5. There are different test frameworks. For this introduction, we use MSTest.
We don’t need FluentAssertions for our example. We uncheck the option and click on the Create button to create the test project.
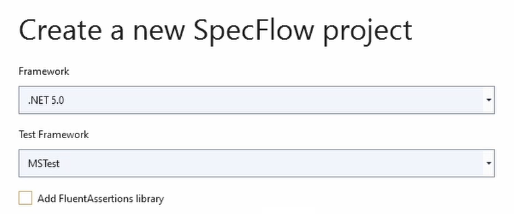
Create a new SpecFlow Project using the SpecFlow Project Template
Let’s take a look at the generated project.
The project template installed the required SpecFlow packages, created a few folders, and added a Calculator feature. We remove the Calculator.feature file, and in the Steps folder, we remove the CalculatorStepDefinitions file because we want to start from scratch and implement a feature specification for our DrivingDemo class library.
Feature Files using Given/When/Then syntax
In the Features folder, we add a new item. In the Add New Item dialog, we click on the SpecFlow tab and select the SpecFlow Feature File template. We name the file DrivingAge.feature.
Now let’s take a look at the generated content of the feature file. We have syntax highlighting in feature files because we installed the SpecFlow Visual Studio Extension.
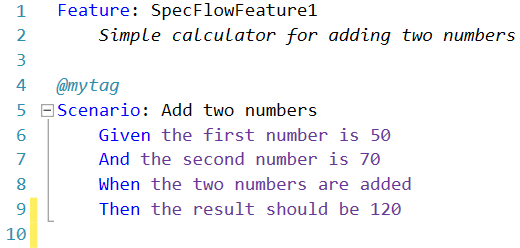
SpecFlow Feature File
Every feature file starts with the feature keyword followed by a colon and the feature file’s name.
On the following lines, we can add a description to document the feature.
Line 4 contains a tag definition. We can use tags to group scenarios and to decide which scenarios to execute. We don’t use them in this introduction.
On the following line, we have the scenario keyword followed by a colon and the scenario’s name.
A scenario is a test case with a given, a when, and a then section. In the given section, we define the state of the system before we perform the action under test. In the when section, we define what action the system performs. In the Then section, we define what state we expect the system to be in after the execution of the when section.
The structure of a SpecFlow scenario allows us to use natural language to phrase a specification. For example, let’s read the generated scenario together.
Given the first number is 50, and the second number is 70 when the two numbers are added, then the result should be 120.
The Example Code
Now we are almost ready to write our first scenario, but first, we need to take a look at the code we want to use in our example.
We have a DrivingRegulations class that contains a definition for the driving ages for different countries. For our scenario, we want to specify the behavior of the IsAllwedToDrive method.
public class DrivingRegulations : IDrivingRegulations
{
    private readonly IDictionary<Country, int> _drivingAges;

    public DrivingRegulations()
    {
        _drivingAges = new Dictionary<Country, int>
        {
            { Country.UnitedStates, 16 },
            { Country.Cyprus, 17 },
            { Country.Switzerland, 18 },
            { Country.Germany, 18 }
        };
    }

    public bool IsAllowedToDrive(Person person, Country country)
    {
        return _drivingAges[country] <= person.Age;
    }
}
I want to point out that it usually makes a lot of sense in the development process to define the scenario before you implement the code. However, to save us time, I provide the implementation code for this video as shown.
Implementing the Feature File
Back in the DrivingAge.feature file, we change the description of the feature to “Checks if a person is allowed to drive a car in a given country”.
Now let’s phrase our first scenario. As we learned before, we start the definition of a scenario with the scenario keyword followed by a colon. We name the scenario “Permitted driving in Switzerland”.
Given the driver is 21 years old, when they live in Switzerland, then they are permitted to drive.
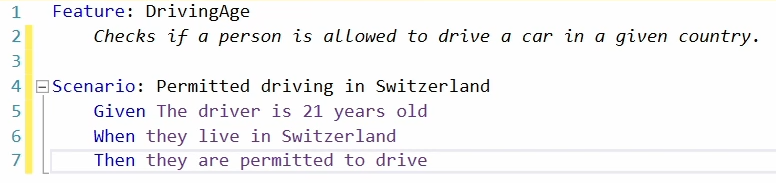
DrivingAge.feature File
All our scenario sections are purple. It means that we do not have a matching step definition yet. Let’s run the scenario nonetheless to see the feedback in the Test Explorer.
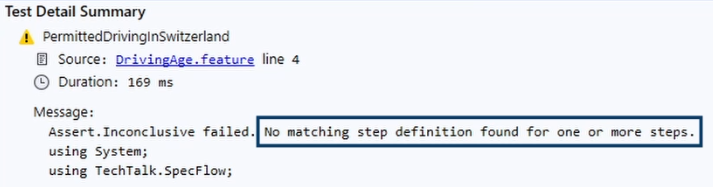
Test Detail Summary for a SpecFlow scenario: No matching step definitions.
As we can see in the test detail summary, there is a message stating that no matching step definitions were found for one or more steps.
Implementing the Step Definition File
Using the SpecFlow Visual Studio extension, we can generate a step definition file based on the scenario. We right-click in the editor and click on Generate Step Definitions.
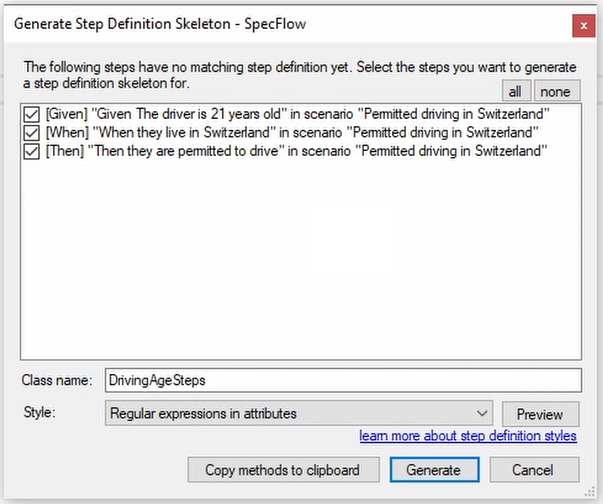
Step File Generation using the SpecFlow Visual Studio Extension
In this dialog, we can select the steps we want to turn into a skeleton in the step definition file. We select all steps and click on the Generate button. We confirm the save file dialog and save the file in the proposed folder.
Let’s take a look at the generated step file.
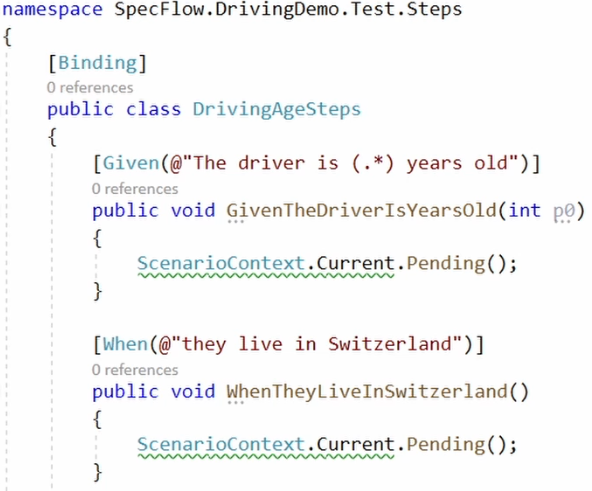
Generated Step Definition File
We have a class definition decorated with the Binding-Attribute from the TechTalk.SpecFlow namespace. This attribute tells SpecFlow to use the definitions in this step file when executing the scenarios.
Let’s take a look at the first method. The method has a Given-Attribute and a string as its argument. As an argument, we provide a regular expression. This regular expression is used to match the step with the definition in the scenario. We can use multiple parameters for step methods using placeholders.
Before we implement the methods in the step file, we need to learn about the ScenarioContext. The ScenarioContext is an object that allows us to transport data between different steps when a scenario is executed.
To use the ScenarioContext, we need to define a constructor and use Dependency Injection to get an instance of the ScenarioContext and save it to a private field.
Now, we are ready to implement the Given step.
First of all, let’s change the regular expression. We know we only want to allow numbers for the age of the driver. We also want to make sure that the programmer uses at least one number. We change the placeholder from (.*) to (\d+).
Next, we rename the parameter to age. After that, we create a new Person object and assign the value of the parameter to the Age property of the Person object.
Last but not least, we store the Person instance in the ScenarioContext to make it available to the following steps. We can use the associative array syntax to add the created Person object to the ScenarioContext.

Implemented Given-Step
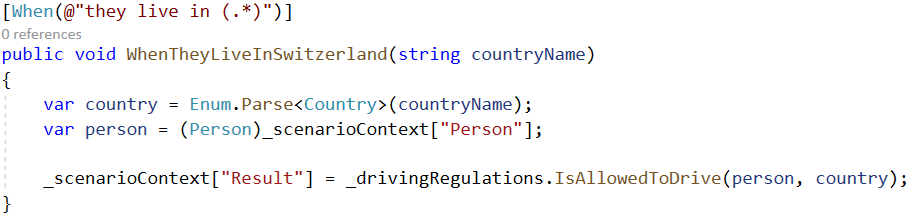
Let’s move on to the When step. Again, we need to change the regular expression. We want to provide the country name as a parameter. This time, we use the default (.*) placeholder syntax as we are using a string argument. We name the parameter countryName.
Next, we Use Enum.Parse to convert the countryName to an enum value.
We access the Person object from the ScenarioContext and save it in the person variable.
Next, we add a new private field of type IDrivingRegulations to the feature class and initialize it with an object of the DrivingRegulations type in the constructor.
Last but not least, we call the IsAllowedToDrive method of the drivingRegulations object in the When-step and provide the country and the person object as arguments.
Like before, we store the result in the ScenarioContext.
Implemented When-Step
Now to the next part, the implementation of the Then step. We do not have any parameters for this step. We use the then step to verify the result.
We access the result from the ScenarioContext, and we cast it to the boolean type. To verify the result, we use Assert.IsTrue and provide the result as its argument. It is comparable to asserts in a normal unit test method.

Implemented Then-Step
Now, let’s open the Test Explorer and run our tests. We can see that our test in the DrivingAgeFeature called PermittedDrivingInSwitzerland successfully completes. I personally like the readable names of the feature and the scenario in the Test Explorer a lot.

Test Explorer with executed SpecFlow scenarios
Adding Additional Scenarios
Let’s open the feature file again. Now that we implemented all steps in the step file, the color of the steps in the feature file turned from purple to black. We also see that the values for the parameters are written using the italic font style and in gray color.
Let’s add another scenario to check if a 16 years old driver is allowed to drive in the United States.
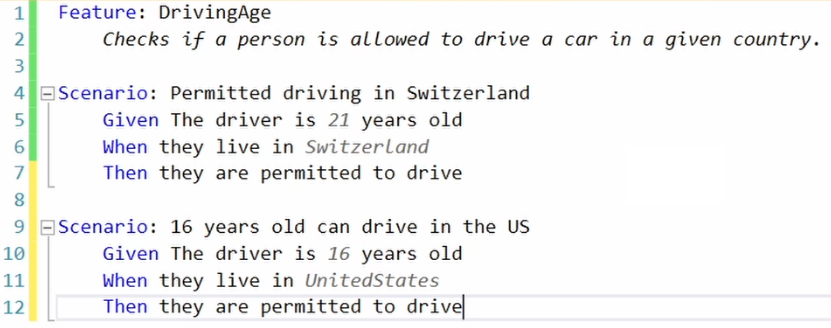
Feature File with a second scenario
Again, we start our scenario with the Scenario keyword followed by a colon and the name of our scenario.
Next, we define the scenario. “Given the driver is 16 years old, when they live in UnitedStates, then they are permitted to drive.”
As you can see, every step definition turns black, which means that SpecFlow finds an executable step for every definition. Let’s execute all the tests for this project in the Test Explorer.
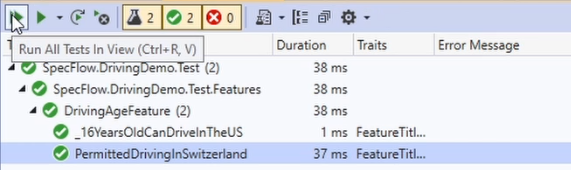
Test Explorer with two SpecFlow scenarios
As expected, both scenarios turn green.
Now let’s add another scenario to test if a 16 years old driver is allowed to drive in Germany. Again, we define the scenario using the keyword followed by the description of the scenario.

Third SpecFlow Scenario
Now, let’s implement the scenario. “Given the driver is 16 years old, when they drive in Germany, then they are not permitted to drive”.
In this scenario, we want to verify that the driver is not allowed to drive. That’s why we change the text in the Then-step to “not permitted”. As you can see, currently there is no step definition that matches this definition.
Let’s open the step definitions file.
In the DrivingAgeSteps.cs file, we copy the implementation of the existing Then-method and change the regular expression in the Then-attribute to match our scenario definition. We also need to change the method name to make it unique within the class.
Next, we change the Assert statement to Assert.IsFalse.

Second Then-Step Implementation
Back in the feature file, we see that the Then step of our latest scenario turned black. Let’s execute the tests in the Test Explorer again.
And as expected, all tests turn green.
That’s the workflow we can use to define and implement SpecFlow scenarios. We could implement more complex examples using advanced regular expressions or more complex business code. But the core concept stays the same.
SpecFlow allows us to write our feature specifications in a natural language. You can execute the scenarios in your development environment or as part of the CI/CD pipeline using the test runner of your choice.
Tips & Tricks
To help you get started with SpecFlow, I want to share a few tips and tricks.
- Always write your scenarios as simple as possible. Like other code in your project, you need to maintain it while the project grows over time.
- Use third-person present tense to describe your scenarios.
- Only use parameters that are important to the scenario.
- Don’t overengineer steps only to make them reusable.
Advanced Use Cases
SpecFlow offers many more advanced features that we cannot cover in this introduction, but I want to let you know about them upfront.
- A Scenario Outline allows us to run the same scenario for different combinations of input and output data. If you have multiple scenarios that are the same except for the parameters, you can combine them into a scenario outline to clean up your feature files. In the test explorer, every row still has its own test execution and result.
- If you have repeating Given steps for all scenarios in a feature, you can extract those definitions to a Background. Steps in a Background are executed at the start of every scenario in the feature.
- Data Tables allow you to pass more complex data than a single argument to a step.
- You can use UI automation or framework integrations to run SpecFlow scenarios in combination with web frameworks such as ASP.NET MVC.
- You can add testing frameworks in your pipeline between SpecFlow and your code under test, for example, TestSharp.
Additional SpecFlow Tools
SpecFlow is part of a rich ecosystem with additional tools, for example:
- The SpecFlow+ Runner, which is a powerful test runner.
- SpecFlow+ LivingDoc, which generates documentation and reports based on your feature definitions.
- SpecMap, which is a story mapping tool for Azure Boards.
You can learn more about SpecFlow and its ecosystem at specflow.org.


