
We will create a Function App in the Azure Portal, create an Azure Function project in Visual Studio, and deploy the implemented Function App onto the Microsoft Azure cloud.
What is/are Azure Functions?
What is the Azure Functions service? Azure Functions is the serverless service on Microsoft Azure. It can be compared to AWS Lambda or Google Cloud Functions.
Azure Functions provides an event-driven, serverless platform to solve problems using various programming languages.
In comparison to Azure App Service, Azure Functions allows developers to focus on problem-solving instead of dealing with a web server or application hosting.
A Function App contains one or many functions deployed together as a deployment unit.
That’s enough we need to know to follow this tutorial. If you want to learn more about the architecture of Azure Functions, take a look at the official website.
Now, let’s open the Azure Portal to create the Function App.
Create a Function App in Azure Portal
In the Azure Portal, click on the Create a resource button.
The Function App resource is featured in the popular products section. We click on the Create link to open the Create Function App wizard.
Create Function App – Basics
In the Basics tab, we select our subscription and resource groups. If you are new to Azure, I suggest reading the Organize your Azure resources article where Azure subscriptions and resource groups are explained in detail.
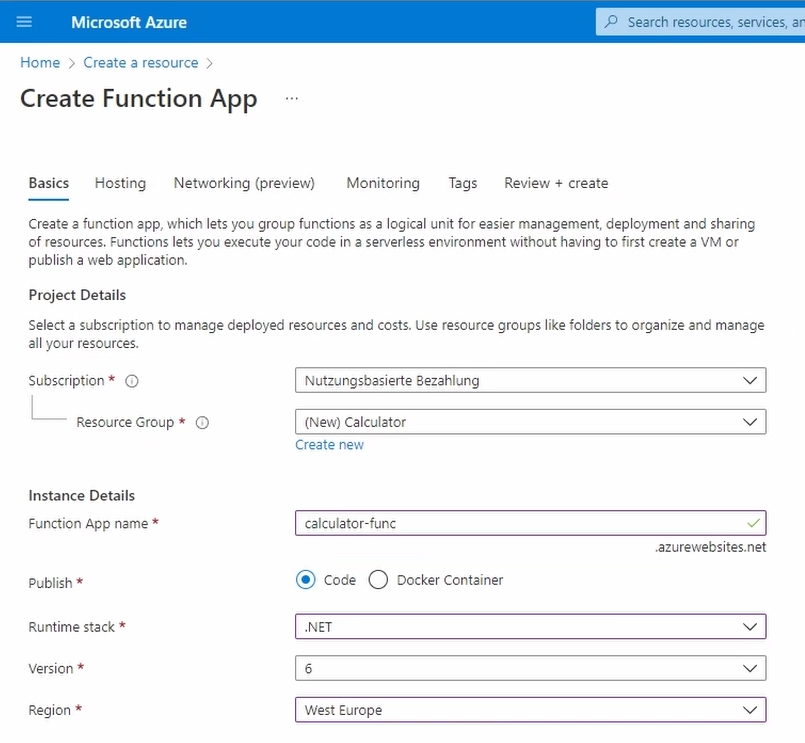
We create a new resource group named Calculator.
Next, we need to provide details about the Function App we want to create. First of all, we need to create a globally unique Function App name that will be the subdomain for the azurewebsites.net domain. This URL is where we will access our Function App.
For our Function App, We choose calculator-func.
Next, we select Code as the Publish option because we won’t add Docker containers in this example.
Next, we need to choose a runtime stack. Azure Function App supports various programming platforms and languages. Besides .NET there is Node.js, Python, Java, and even PowerShell Core support.
In this example, we want to write our code using C# and select .NET as our runtime stack.
After selecting the runtime stack, the version selection contains two options. There is .NET Core 3.1, and .NET 6, which both are at the time of creating this video, supported .NET versions.
Because we want to use the latest version and start a new project, it makes sense to select .NET 6 for our example.
The last option in the Basics tab is to select a region. If you are new to Azure, this article helps you select the best region.
For this example, I select West Europe, which is the region I have most of my resources.
Finally, we click the Next button that takes us to the Hosting tab.
Create Function App – Hosting
First, we need to choose a Storage account. A Storage account is a service that allows to store data. For example, you can store blob data. The storage account can be used directly from an application, or in this case, we connect our Azure Function with the storage account.
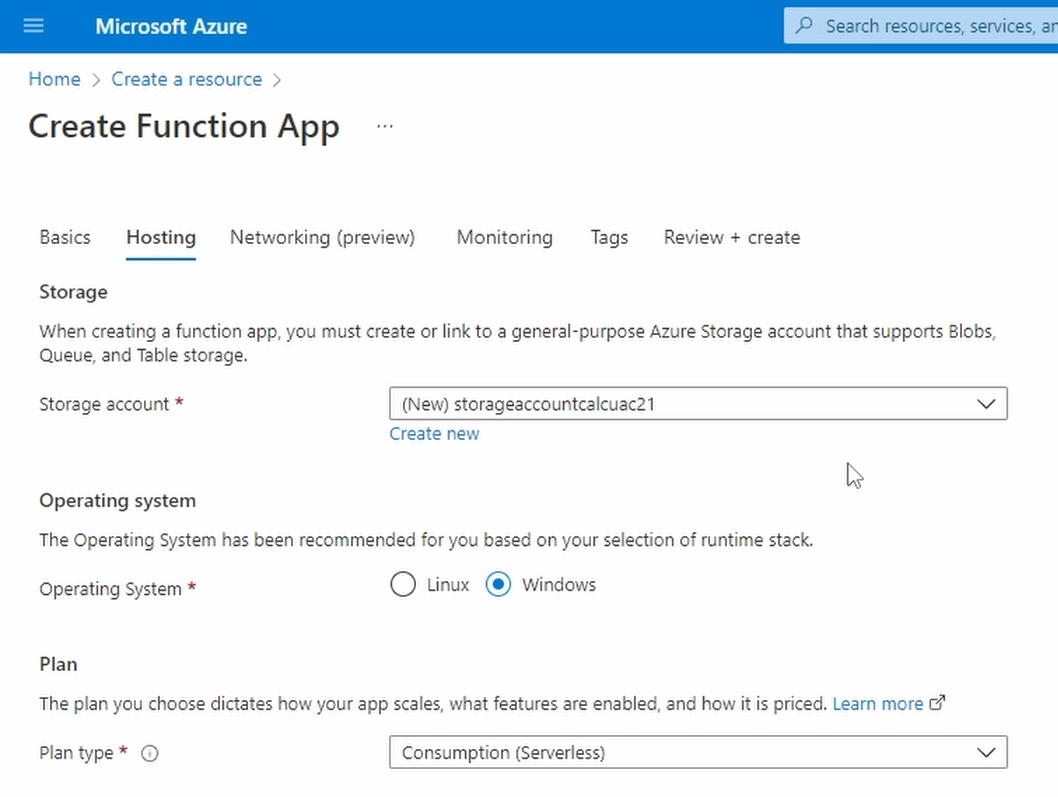
The storage account will hold our implemented code, log data, and other information. We won’t go into more detail in this tutorial.
We have the option to take the autogenerated Storage account name, but I suggest naming your resources yourself. It helps finding the right resource in the Azure portal. We name the Storage account calculatorfunc because we only want to store data from our Azure Function in this Storage account.
Next, we can choose between Linux and Windows as the operating system to execute our functions. .NET is cross-platform and supports both platforms. For this tutorial, I choose Windows.
The last option in the Hosting tab is to choose the pricing model. There are three options, and we choose the Consumption type, which is the default selection. It allows the function to scale and you only pay for resources you consume. If you want to learn more about the other pricing options, take a look at the documentation.
We click on the Next button.
Create Function App – Networking
Networking is not available for Azure Function Apps that use the consumption plan. We click on the Next button to get to the Monitoring tab.
Create Function App – Monitoring
We can automatically create an Application Insights instance to monitor our Azure Function. I would usually suggest creating an Application Insights instance and integrating it into your Function App to monitor your functions.
However, to keep things simple for this tutorial and focus on creating our first Azure Function App, I disable Application Insights.
We click the Next button once again.
Create Function App – Tags
As described in the portal, we can set tags to organize our Azure resources. I skip this step, and we click on the Review and Create button.
Create Function App – Review & Create
We see a summary of how we configured our Azure Function App. It makes sense to check for typing errors and other mistakes before hitting the Create button. However, keep in mind that deleting Azure resources after their creation is always an option.
Let’s click the Create button and wait until the Function App is deployed.
Create an Azure Function project in Visual Studio
While we wait for Azure to create our Function App, we create a new Azure Function project in Visual Studio 2022.
In the Create a new project dialog, we select the Azure Functions project template. On the next page, we name the project Calculator and set its location. We use the same name as the solution name and click on Create.
The next dialog is specific to Azure Function Apps and lets us create either an empty project or a project with a function with a particular trigger. There are queue triggers, HTTP triggers, blob triggers, timer triggers, and much more.
For our first function, we select the HTTP trigger, which creates a function that will run whenever it receives an HTTP request.
We stick with the defaults for the other options and press the Create button.
The Project Structure of an Azure Function Project
After a few seconds, Visual Studio created the project for us. Let’s take a look at the project structure.
First, let’s open the properties of the project using the context menu. The output type of the project is Class Library, and the target framework is .NET 6.
Now, let’s look at the installed NuGet packages. We open the Packages folder in the Solution Explorer and see that we only have a single dependency so far. The Microsoft.NET.Sdk.Functions package contains everything we need to implement a basic Azure Function.
Next, we open the Function1.cs file. It contains the definition and implementation of the generated function. Let’s look at it in more detail.
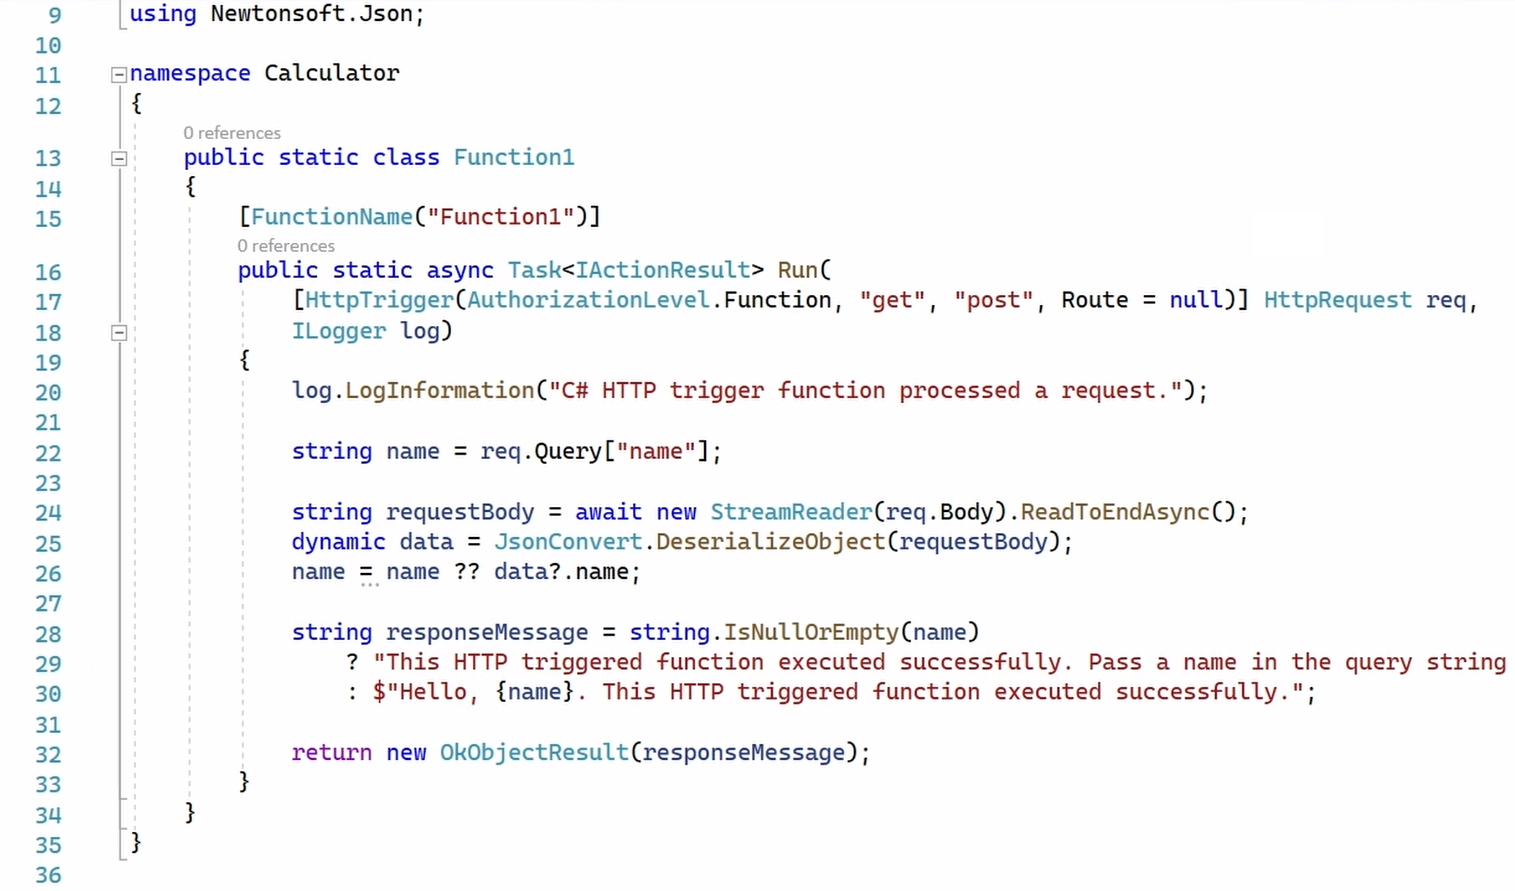
On line 15, we have the FunctionName attribute. It defines the name of the function. We can name the class containing the function different from the name of the Azure function. However, for C# Azure Function Apps, I would suggest naming both the class and the function the same.
In the following line, we have the method definition of the Run method. This method gets called by the Azure Functions runtime when a function trigger is executed.
The first argument of the Run method is of type HttpRequest. It also has an attribute of type HttpTrigger. This definition is the C# way of telling Azure Functions that the function should be run whenever the HttpTrigger gets executed.
The second argument of the Run method is a logger. Logging is very helpful when dealing with Azure Functions because often, you have a set of different Functions to build a solution, and you need to make sure you understand what happens or doesn’t happen in your system.
The implementation of the method looks for a name query argument and writes a response message depending on whether a name is provided in the HTTP request.
Implementing the Sum Function
Now that we understand the basics of the Azure Function App and the generated function in our project let’s implement a function for our Calculator Function app.
We rename the class to Sum. We also set the FunctionName attribute to Sum.
Next, we delete the content of the Run method but keep the log statement on the first line of the implementation and the return statement.
Next, we read the x and y arguments from the query string and parse them to an int variable.
After that, we calculate the sum of both values and store it in the result variable. Last but not least, we change the argument of the OkObjectResult to the result variable.
Running and Testing the Function App
That’s it for now. Let’s build and start the application.
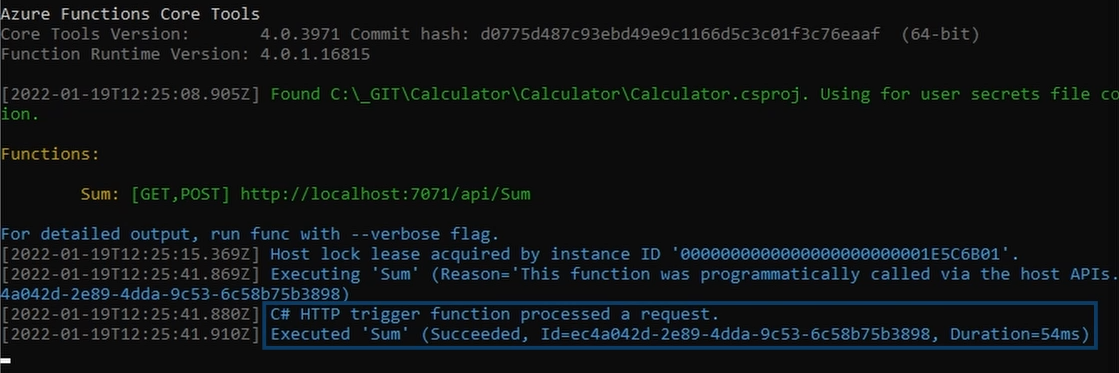
In the console, we see that our application is running a function with the name Sum at the specified URL on localhost.
Let’s open a browser, open the specified URL, and append the x and y query arguments. Let’s set x to 10 and y to 16. We hit enter and get 26 as the response for our HTTP request.
In the console window of the running Function App, we see a log statement that the function has been executed.
I want to note that you can debug the function as you would with any other .NET code.
However, I don’t cover debugging in this tutorial.
Publish and Deploy the Function App to Azure
Instead, let’s publish and deploy the Function App to Microsoft Azure.
Back in Visual Studio, we right-click the project and select the Publish menu. Of course, it’s possible to build and deploy the Function app from a CI/CD pipeline like Azure DevOps. However, we’re going to publish the Function App from Visual Studio for this tutorial to keep things simple for now.
In the Publish dialog, we select Azure as the target and click Next. We set Azure Function App on Windows for the specific target and press the Next button again. Now we select the Calculator Function App we created in the first part of this tutorial. After that, we click on the Finish button to create the Publish profile.
We now have a Publish profile but haven’t deployed the app. To deploy the application to Microsoft Azure, we click on the Publish button.
It takes a few seconds to build and deploy the Function App. If the deployment is successful, we see an information box at the top.
Testing the Function on Microsoft Azure
Let’s copy the site URL, open a browser again and use the URL and apply the same x and y query arguments to it.
We get a 401 response. When running a function with an HTTP trigger, we need to provide a key for security reasons.
Let’s go back to the Function App in the Azure Portal and open the Function App resource. In the menu on the left, we click on the Functions menu. We see a list of all the functions within our deployed Function App.
We currently only have our Sum function in this list. To see more details, we click on the name of the function. We click on the Get Function URL button in the toolbar. A popup opens, and we copy the URL, which contains a code argument, to the clipboard.
We insert the URL from the clipboard in the other browser tab and append the x and y arguments. Finally, we hit enter to send the HTTP request.
And this time, we get 26 as a result of our request. Congratulations, you created and implemented your first Azure Function App using C# and .NET 6.
What’s Next?
If you want to learn more about .NET development, subscribe to this channel and watch this video next to learn everything you need to know about .NET 6.


