
This video is part of The FREE Blazor Crash Course. In this crash course, we build an actual Blazor WebAssembly application based on .NET 5.
Table of Content
- The FREE Blazor Crash Course – Getting Started
- Blazor Form Component & Validation
- Blazor API Handling (this article)
- Blazor Modal Dialog Component
- Blazor CSS Handling
- Static Images
- Building a Dashboard
- End-to-End Testing using SpecFlow
In this video, we will learn all about API handling in Blazor components. We will implement a simple data table and populate its data using an API call from the Blazor web application to an ASP.NET WebAPI backend.
We will also store the form data provided by the user using another API call.
Let’s take a look at what we’re going to build.
API Handling (Demo)
In the completed demo application, we have an Earnings page with a table on the left and the form on the right. In the previous video of this series, we built the form that we see on the right.
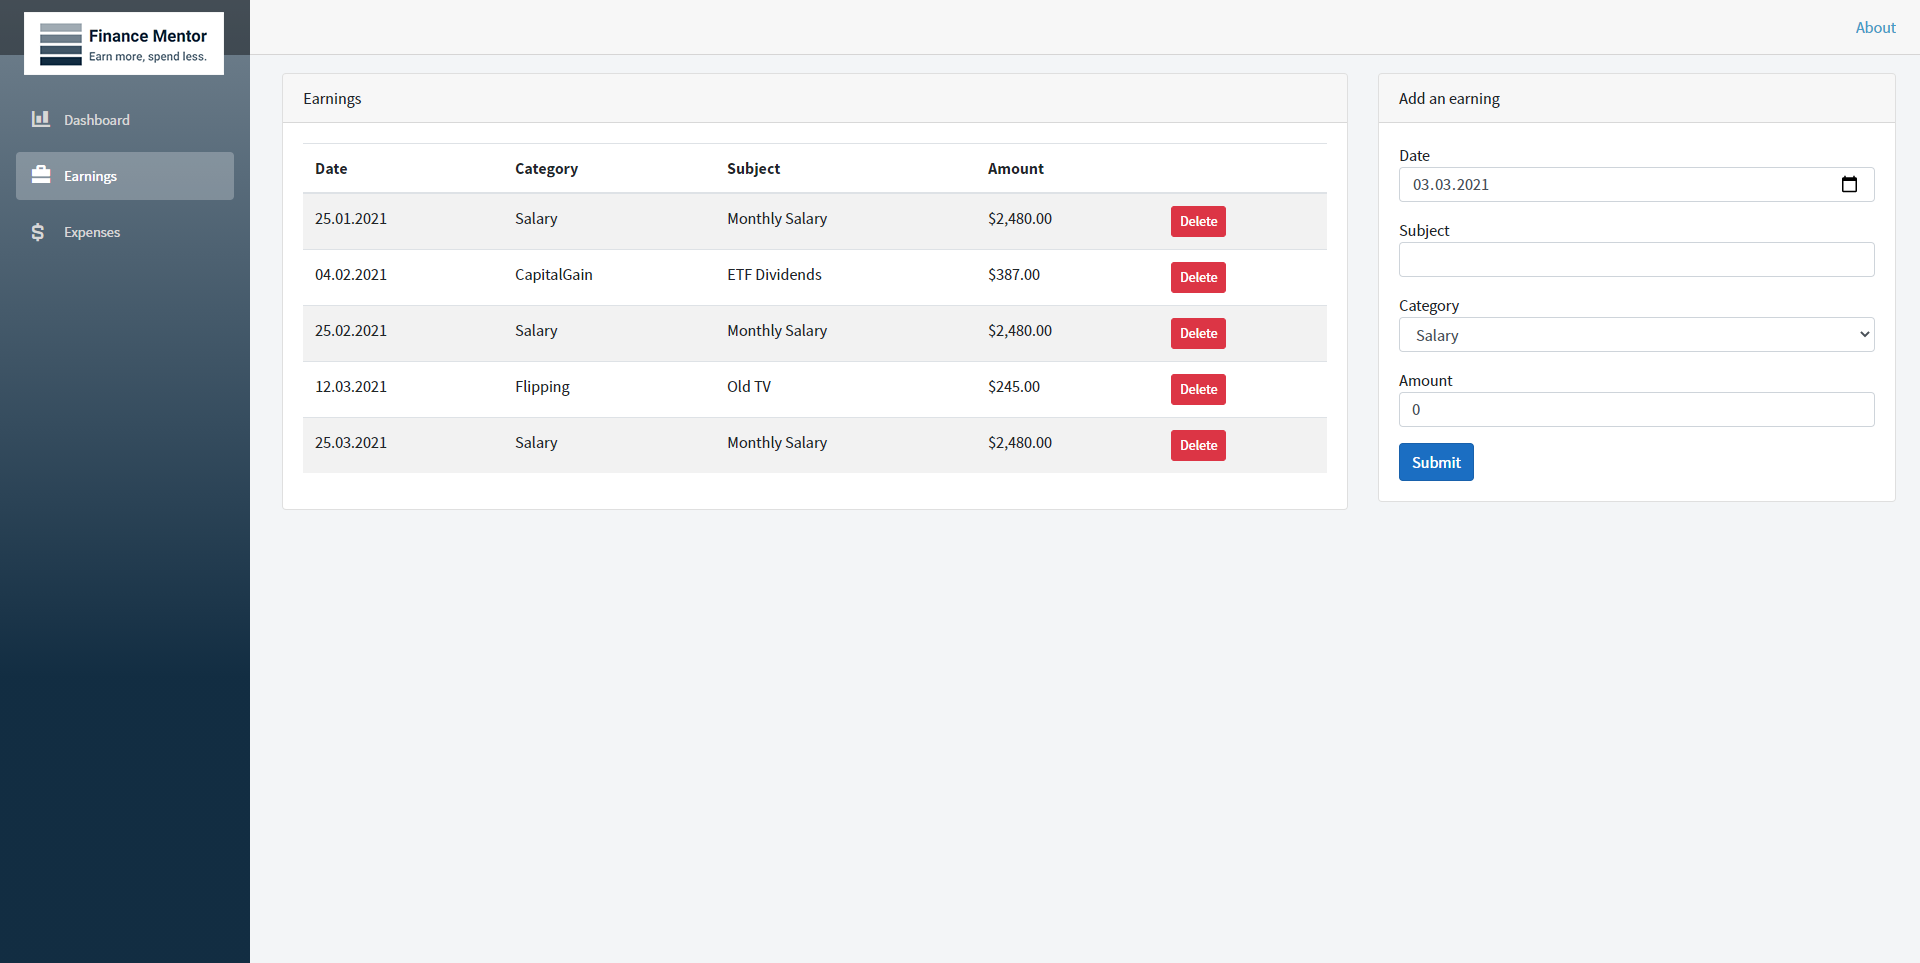
Demo App (Completed): We’re going to populat the table on the left and store user data from form input.
In this video, we will implement the table on the left and populate its data with data from an API. We will also implement the form submit, which will add a new item to the table on the left.
Implement the Earnings Page Template
Now, let’s jump into Visual Studio, and let’s implement the Earnings page. Right now, we only have the EarningForm component on our page. Let’s change that. I insert a prepared HTML snippet for the table.
<div class="row">
<div class="col-lg-8">
<div class="card">
<div class="card-header">
Earnings
</div>
<div class="card-body">
<table class="table table-striped">
<thead>
<tr>
<th>Date</th>
<th>Category</th>
<th>Subject</th>
<th>Amount</th>
</tr>
</thead>
<tbody>
@if (earnings == null)
{
<tr><td><em>Loading...</em></td></tr>
}
else
{
@foreach (var earning in earnings)
{
<tr>
<td>@earning.Date.ToShortDateString()</td>
<td>@earning.Category</td>
<td>@earning.Subject</td>
<td>@earning.Amount.ToString("C2", CultureInfo.CreateSpecificCulture("en-US"))</td>
</tr>
}
}
</tbody>
</table>
</div>
</div>
</div>
<div class="col-lg-4">
<EarningForm></EarningForm>
</div>
</div>
<div> </div>
Now let’s go through the code together. First of all, we make use of a lot of Bootstrap CSS. It doesn’t matter if you don’t know Bootstrap. It makes our page look great, and we don’t have to mess with the CSS right now.
I still want to explain how our layout works. We have a row, and within that row, we have two columns. We have an eight-unit-wide column that contains the table, and on the right side, we have a four-unit-wide column that contains the form component we built in the previous video.
Within the eight-unit-wide column on the left, we have our HTML table that contains the data we want to display on the page. First, we have the table header with the labels for each column, and below, we have the data enclosed by the “tbody” element.
Now let’s take a closer look at the Blazor specific parts. The if statement checks if there is any data to display. If there is, we use a foreach statement to render every data row. If there is no data, we show a loading message.
Within the foreach statement, we render every field from the earning variable. It is a new type we are going to build next.
Implement the Code Section of the Earnings Page
But before we implement a new class, let’s implement the code section. We need to declare the earning variable. We do that by adding a private earnings variable.
Next, let’s assume we already implemented our Earning class. We want to load the data as soon as the user navigates to the Earnings page. We can achieve that by overriding a lifecycle method.
We override the OnInitializedAsync method. This method gets called whenever the user navigates to the page. It has no arguments, and because it is an asynchronous method, it returns a Task.
The implementation of the method is simple, but first, let’s inject an instance of the HttpClient. We scroll up and use the @inject directive and inject the HttpClient and make it available as the Http variable.
@inject HttpClient Http;
If you ask yourself what implementation we get from the dependency injection container for the HttpClient type, let’s look at the Program.cs file. We already talked about it in the first video of this Crash Course. On line 10, we add an implementation of the HttpClient type to the dependency injection container and configure it to use the correct base address to access the backend.
namespace FinanceMentor.Client
{
    public class Program
    {
        public static async Task Main(string[] args)
        {
            var builder = WebAssemblyHostBuilder.CreateDefault(args);
            builder.RootComponents.Add<App>("#app");

            builder.Services.AddScoped(sp => new HttpClient { BaseAddress = new Uri(builder.HostEnvironment.BaseAddress) });

            await builder.Build().RunAsync();
        }
    }
}
Back in our method, we use the following line to fetch data from the API. We use the GetFromJsonAsync method to fetch data from the “api/Earnings” endpoint and assign the return data to the earnings variable.
@code {
    private Earning[] earnings;

    protected async override Task OnInitializedAsync()
    {
        earnings = await Http.GetFromJsonAsync<Earning[]>("api/Earnings");
        StateHasChanged();
    }
}
We’re almost there. The last thing we need to do is to tell the component that we changed its state. Blazor will rerender the component if the state has changed. We do that by calling the StateHasChanged method.
Implementing the Earning class
Now that we implemented the Earnings page, we need to create the Earning class which holds our data. We want to place this class in the Shared project because we use it client-side and server-side.
Right-click on the Shared project and add a new class called Earning. Again, to save us some time in code that is not Blazor specific, I’m going to insert a code snippet with the implementation of this class.
public class Earning
{
  public Earning()
  {
    Id = Guid.NewGuid();
  }
  public Guid Id { get; set; }
  public DateTime Date { get; set; }
  public string Subject { get; set; }
  public EarningCategory Category { get; set; }
  public decimal Amount { get; set; }
}
The Earning data class contains fields to hold our information. We also defined an Id property with a globally unique identifier that will allow us to distinguish different data rows.
In the Earnings page file, we can add a using statement to fix the missing type errors.
Implement the API
We’re almost there. We already have the client code, and we have the data class. We now need to implement a controller that returns our data.
Again, the focus of this Crash Course is to learn about Blazor. That’s why I go through building this EarningsController quickly.
I create a new EarningsController class and replace the code with the following snippet.
using FinanceMentor.Shared;
using Microsoft.AspNetCore.Mvc;
using System.Collections.Generic;
using System.Linq;

namespace FinanceMentor.Server.Controllers
{
    [Route("api/[controller]")]
    [ApiController]
    public class EarningsController : ControllerBase
    {
        private readonly IRepository<Earning> _earningRepository;

        public EarningsController(IRepository<Earning> earningRepository)
        {
            _earningRepository = earningRepository;
        }

        [HttpGet]
        public IEnumerable<Earning> Get()
        {
            return _earningRepository.GetAll()
                .OrderBy(earning => earning.Date);
        }
    }
}
We have an APIController attribute on the class, a private field that contains a reference to a repository of the type Earning. We get the implementation in the constructor using dependency injection. Next, we have the Get method, which has the HttpGet attribute applied. We use the repository to return all entries ordered by date.
Next, we need to implement the repository. We create a new folder called Storage and create an interface named IRepository. I insert another code snippet that contains the definition of the Add, Remove, and the GetAll method.
using System.Collections.Generic;

namespace FinanceMentor.Server.Storage
{
    public interface IRepository<T>
    {
        void Add(T entity);
        void Remove(T entity);
        IEnumerable<T> GetAll();
    }
}
Let’s implement the IRepository interface. We create a MemoryRepository class in the Storage folder. Of course, I also prepared a snippet for the implementation of this class.
using System.Collections.Generic;

namespace FinanceMentor.Server.Storage
{
    public class MemoryRepository<T> : IRepository<T>
    {
        private readonly IList<T> _entities;

        public MemoryRepository()
        {
            _entities = new List<T>();
        }

        public void Add(T entity)
        {
            _entities.Add(entity);
        }

        public IEnumerable<T> GetAll()
        {
            return _entities;
        }

        public void Remove(T entity)
        {
            _entities.Remove(entity);
        }
    }
}
We use a List that holds our data in memory as long as the application runs.
Back in the EarningsController, we can import the missing namespace for the IRepository type.
Last but not least, we need to register the repository with the dependency injection container. We create another class called SampleData.cs.
We insert another snippet.
using FinanceMentor.Server.Storage;
using FinanceMentor.Shared;
using Microsoft.Extensions.DependencyInjection;
using System;

namespace FinanceMentor.Server
{
    public static class SampleData
    {
        public static void AddEarningsRepository(this IServiceCollection services)
        {
            var today = DateTime.Today;
            var lastMonth = DateTime.Today.AddMonths(-1);
            var previousMonth = DateTime.Today.AddMonths(-2);

            var earningRepository = new MemoryRepository<Earning>();

            earningRepository.Add(new Earning { Date = new DateTime(previousMonth.Year, previousMonth.Month, 25), Amount = 2480, Category = EarningCategory.Salary, Subject = "Monthly Salary" });
            earningRepository.Add(new Earning { Date = new DateTime(previousMonth.Year, previousMonth.Month, 12), Amount = 440, Category = EarningCategory.Freelancing, Subject = "Freelancing Client A" });
            earningRepository.Add(new Earning { Date = new DateTime(lastMonth.Year, lastMonth.Month, 25), Amount = 2480, Category = EarningCategory.Salary, Subject = "Monthly Salary" });
            earningRepository.Add(new Earning { Date = new DateTime(lastMonth.Year, lastMonth.Month, 12), Amount = 790, Category = EarningCategory.Freelancing, Subject = "Freelancing Client A" });
            earningRepository.Add(new Earning { Date = new DateTime(lastMonth.Year, lastMonth.Month, 4), Amount = 387, Category = EarningCategory.CapitalGain, Subject = "ETF Dividends" });
            earningRepository.Add(new Earning { Date = new DateTime(today.Year, today.Month, 25), Amount = 2480, Category = EarningCategory.Salary, Subject = "Monthly Salary" });
            earningRepository.Add(new Earning { Date = new DateTime(today.Year, today.Month, 14), Amount = 680, Category = EarningCategory.Freelancing, Subject = "Freelancing Client A" });
            earningRepository.Add(new Earning { Date = new DateTime(today.Year, today.Month, 12), Amount = 245, Category = EarningCategory.Flipping, Subject = "Old TV" });

            services.AddSingleton<IRepository<Earning>>(earningRepository);
        }
    }
}
This class contains the definition of an extension method we’re going to use in the application’s startup class in a few seconds. We create a few data rows with sample data and register the repository with the dependency injection container.
In the Startup.cs file, we call the AddEarningsRepository method in the ConfigureServices method.
public void ConfigureServices(IServiceCollection services)
        {
            services.AddControllersWithViews();
            services.AddRazorPages();
            services.AddEarningsRepository();
        }
Wow, that was a lot. The good news is that we now have all the API code we need in the Server project.
I know, if you don’t know ASP.NET WebAPI yet, this is a lot. At this point, you do not need to worry about it. Let’s focus on Blazor development in this Crash Course.
Start and Test the Application
Now that we have the Blazor code and the server-side code in place, let’s build and run the application.
Click on the Earnings menu to open the Earnings page. And there it is! We have a table on the left showing the sample data and the form on the right.
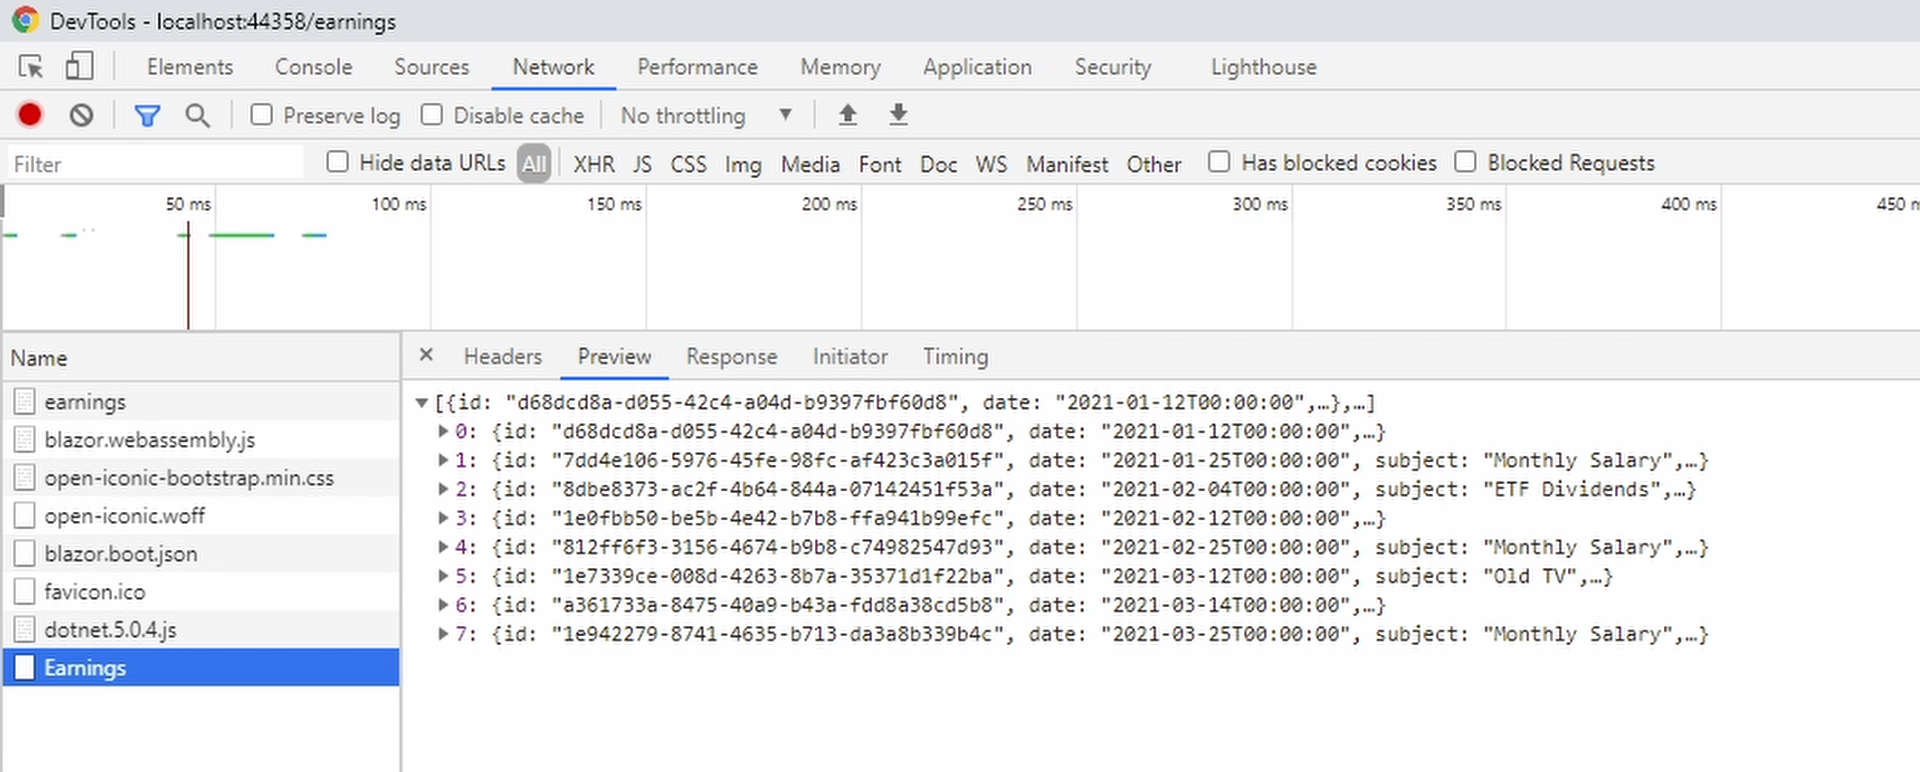
Developer Tools – API Request data
Now let’s open the developer tools and take a closer look at how we load the data. I press F5 to reload the application. As we can see, there is a fetch request to the “localhost:44358/api/Earnings” address. If I click on it, we can see the JSON data we receive in the preview window.
Implement the Form Submit
Now that we can fetch data from our API and display it on the Earnings page, we want to handle the form submit and add user data to the application.
Open the EarningForm component. First, we want to inject the HttpClient into our component. Next, we jump to the implementation of the HandleValidSubmit method. We don’t need the success variable anymore and delete it.
Next, we use the HttpClient instance to post JSON data to the API.
@code {
    private EarningModel earning = new EarningModel { Date = DateTime.Today };

    public async Task HandleValidSubmit()
    {
        await Http.PostAsJsonAsync<EarningModel>("api/Earnings", earning);
    }
}
Because we call an asynchronous method, we need to mark the HandleValidInput method with the async keyword and change the return type from void to Task.
Open the EarningsController in the Server project. We add a method to handle the http post request.
[HttpPost]
        public void Post(Earning earning)
        {
            _earningRepository.Add(earning);
        }
Now let’s start the application again.
Open the Earnings page and fill in the form on the right and click the Submit button.
Now let’s reload the page, and we can see the new item we just added.
As you can tell, we’re almost there. Wouldn’t it be great if the table would refresh as soon as we submit the form?
Let’s head back to Visual Studio.
Reload Data in the Parent Component
We post data from the EarningForm component, but the table is part of its parent component, the Earnings page. We need to find a way to tell the Earnings page to refresh whenever a user clicks the submit button of the EarningForm component.
There are multiple ways we can do that. For now, we use a simple solution. Let’s define a new property in the EarningForm component. We create a public property of type EventCallback and name it OnSubmitCallback. We also add the Parameter attribute, which makes this property available when the component is used.
[Parameter]
    public EventCallback OnSubmitCallback { get; set; }
Next, we execute the callback after we post the data to the API in the HandleValidSubmit method.
@code {
    private EarningModel earning = new EarningModel { Date = DateTime.Today };

    [Parameter]
    public EventCallback OnSubmitCallback { get; set; }

    public async Task HandleValidSubmit()
    {
        await Http.PostAsJsonAsync<EarningModel>("api/Earnings", earning);
        await OnSubmitCallback.InvokeAsync();
    }
}
The idea is that we provide a callback to the EarningForm component that gets executed after we send the data to the API. Now we need to provide the callback from within the Earnings page.
We open the Earnings page and implement a Refresh method. In this method, we want to reload the data. We already have this behavior in the OnInitializedAsync method. Let’s extract the code into a LoadData method to call it in both the OnInitializedAsync and the Refresh method.
@code {
    private Earning[] earnings;

    protected async override Task OnInitializedAsync()
    {
        await LoadData();
    }

    private async Task LoadData()
    {
        earnings = await Http.GetFromJsonAsync<Earning[]>("api/Earnings");
        StateHasChanged();
    }

    public async void Refresh()
    {
        await LoadData();
    }
}
Next, we want to provide the Refresh method to the EarningForm component. We can do that by setting the OnSubmitCallback attribute to the Refresh method in the template definition. Don’t forget to add a @ symbol in front of the method name.
<EarningForm OnSubmitCallback="@Refresh"></EarningForm>
Let’s start the application again.
We go to the Earnings page, and once again, we fill in the form on the right side. This time, when we hit the Submit button, the table on the left refreshes, and we instantly see the new data loaded from the API.
Congratulations! You successfully implemented API handling into our Blazor WebAssembly application.
Summary
This video is the third part of the Blazor Crash Course. You learned how to save data and how to load data from the backend using the HttpClient.
Using the HttpClient, we learned how to use Dependency Injection in Blazor applications.
Next, we implemented a simple API controller using ASP.NET Core WebAPI.
We learned how implementing the OnInitializedAsync method allows us to execute code when a page is loaded.
You also learned how to use the EventCallback type to provide a method from a parent component to its child and execute the method in the child component.
We used this technique to reload data in the parent component when a user submits the child component’s form.
What’s Next?
In the following video of this series, we’ll be implementing a simple modal dialog solution using a Blazor component and Bootstrap. You’ll learn about the power of reusable components.
Tell me in the comments what you think about Blazor so far? Do you see its potential, and how do you like the programming model?


