
The traditional Asp.Net Core application templates are perfect for backend applications. However, if you want to architect microservices and cloud-native applications, those templates can be a little too much.
That’s where Minimal APIs come into play. Minimal APIs allow you to create HTTP APIs with minimal dependencies and a minimal number of files.
Today, we will learn about Minimal APIs in .NET 6, and if you stay with me until the end, you’ll learn about the use cases that fit Minimal APIs best.
Learning everything about ASP.NET Core can be overwhelming. Minimal APIs offer an alternative, and we’re going to learn about it together.
This tutorial teaches the basics of building a minimal web API with ASP.NET Core.
Creating an ASP.NET Core Web API project
First of all, we have to create a new ASP.NET Core Web API project in the Visual Studio project creation wizard. Let’s name the project ShoppingList and click on the Next button.
We stick with .NET 6 as the target framework in the following dialog. However, we uncheck the “Use controllers” option. I wish there were a better user experience to choose between Minimal APIs and Controller based projects, but it is what it is.
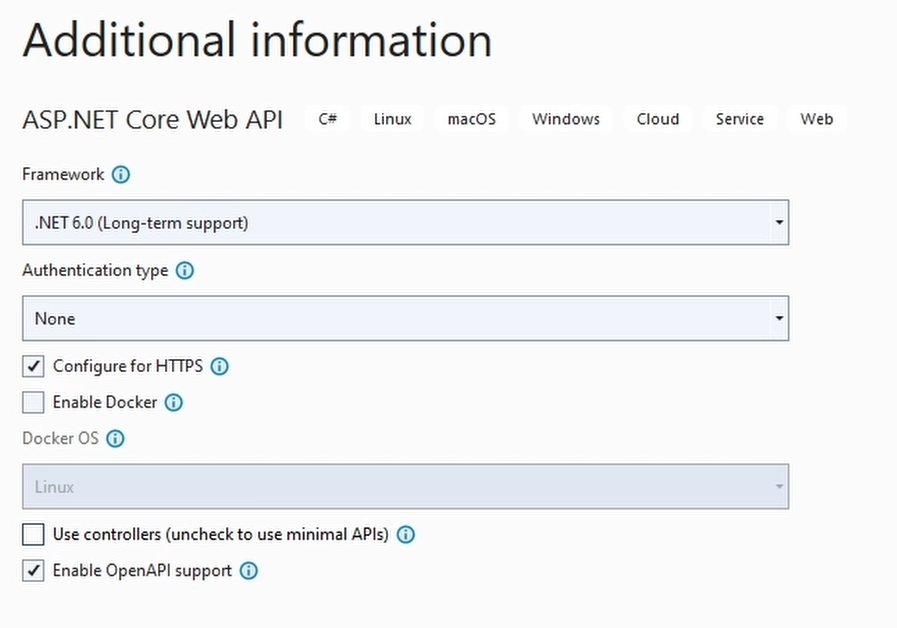
If you check the option, you will get a project using controllers. If you uncheck the option, you will get a project with Minimal APIs.
Click on the Create button, and Visual Studio will create the project for us.
Exploring the Program.cs
Before we change anything, let’s explore the project.
First of all, we have a Program.cs file that contains the entire project. Well, there is a launchSettings.json and appsettings.json file, but other than that, everything code-related is within the Program.cs file.
var builder = WebApplication.CreateBuilder(args);

// Add services to the container.
// Learn more about configuring Swagger/OpenAPI at https://aka.ms/aspnetcore/swashbuckle
builder.Services.AddEndpointsApiExplorer();
builder.Services.AddSwaggerGen();

var app = builder.Build();

// Configure the HTTP request pipeline.
if (app.Environment.IsDevelopment())
{
  app.UseSwagger();
  app.UseSwaggerUI();
}

app.UseHttpsRedirection();

var summaries = new[]
{
    "Freezing", "Bracing", "Chilly", "Cool", "Mild", "Warm", "Balmy", "Hot", "Sweltering", "Scorching"
};

app.MapGet("/weatherforecast", () =>
{
  var forecast = Enumerable.Range(1, 5).Select(index =>
     new WeatherForecast
     (
         DateTime.Now.AddDays(index),
         Random.Shared.Next(-20, 55),
         summaries[Random.Shared.Next(summaries.Length)]
     ))
      .ToArray();
  return forecast;
})
.WithName("GetWeatherForecast");

app.Run();

internal record WeatherForecast(DateTime Date, int TemperatureC, string? Summary)
{
  public int TemperatureF => 32 + (int)(TemperatureC / 0.5556);
}
We don’t see any namespace definitions because this template uses the top-level statements introduced in C# 10. If you aren’t familiar with top-level statements, check out the Top-Level-Statements in C# video.
We create a builder using the WebApplication builder factory added in .NET 6.
Next, we register services and build the container like any other .NET application. After the container is built, we use the app variable of type WebApplication to configure the HTTP pipeline.
Last but not least, we start the application by running the Run method. Let’s remove the example code for the weather forecast endpoint.
We only have 20 lines to create an ASP.NET Core Web API application without the example code.
Create a HelloWorld endpoint
Now that we have a clean project let’s add a simple hello world endpoint. We use the app variable and call the MapGet method.
var builder = WebApplication.CreateBuilder(args);
var app = builder.Build();

app.MapGet("/", () => "Hello World!");

app.Run();
As the first argument, we provide the URL we want to use to reach the endpoint.
As the second argument, we provide an anonymous method using the lambda syntax without any argument. We use a simple “Hello World” string as the return statement.
Let’s run the application.
We use the Swagger interface to execute the hello endpoint. Alternatively, we can also open a new tab and paste the URL of the endpoint to get the result.
Add the sample code
Now that we have our first endpoint, I will add a few example types to the project.
I created an Item class, an ItemRepository interface, and an ItemRepository implementation of that interface.
public class Item
{
  public Item(string description, int quantity)
  {
    Description = description;
    Quantity = quantity;
    Id = Guid.NewGuid();
  }

  public Guid Id { get; set; }

  public string Description { get; set; }

  public int Quantity { get; set; }
}

public interface IItemRepository
{
  void Add(Item item);
  void Delete(Item item);
  Item Get(Guid id);
  void Update(Item item);
  IEnumerable<Item> GetAll();
}

public class ItemRepository : IItemRepository
{
  private readonly IList<Item> _items;
  public ItemRepository()
  {
    _items = new List<Item>();
  }

  public void Add(Item item)
  {
    _items.Add(item);
  }

  public void Delete(Item item)
  {
    _items.Remove(item);
  }

  public Item Get(Guid id)
  {
    return _items.Single(item => item.Id == id);
  }

  public void Update(Item item)
  {
    var listItem = _items.Single(item => item.Id == item.Id);

    listItem.Description = item.Description;
    listItem.Quantity = item.Quantity;
  }

  public IEnumerable<Item> GetAll()
  {
    return _items;
  }
}
We also need to register the ItemRepository as a singleton in the application builder.
builder.Services.AddSingleton<IItemRepository, ItemRepository>();
The example code is out of the scope of this tutorial, but we want to implement basic HTTP endpoints to work with the shopping item repository next.
Create a Get endpoint
Let’s add a get endpoint that returns a single item from the repository.
app.MapGet("/items/{id}", (Guid id, IItemRepository itemRepository) =>
{
  return itemRepository.Get(id);
});
Again, we use the MapGet method of the web application type. This time, use the parameter syntax to define an id parameter of type Guid.
In the second argument, we again define an anonymous method. However, this time, we add a parameter of type Guid with the name id to it. It will get populated by ASP.NET Core when the endpoint is hit.
As the second parameter, we use a parameter of the IItemRepository type. We can use every type that we registered in the application builder before. It’s how you can use dependency injection when working with Minimal APIs.
Within the method body, we use the itemRepository variable, and we call the Get method and provide the id as its argument.
Create a Post endpoint
Before we do another test, let’s add a post endpoint to add items to our shopping cart.
app.MapPost("/items", (Item item, IItemRepository itemRepository) =>
{
  itemRepository.Add(item);
});
We use the MapPost method and use /items as the URL. For the first parameter, we use the Item type. It will hold the information we get over HTTP. And for the second parameter, we use the IItemRepository type again.
We call the add method on the item repository within the method implementation and provide the item as its argument.
To simplify testing, we add another get endpoint to return all items in the shopping cart. We use the MapGet method again, providing the /items route as its first argument and the item repository as the sole parameter in the anonymous method.
Testing Get/Post endpoints
Now that we have two additional get endpoints and a post endpoint let’s run the application again to see if it works as expected.
First, let’s add an item to the shopping cart. We open the post endpoint in Swagger and click on the “Try it out” button. We modify the request body and send a description and a quantity by pressing the Execute button.
Next, we open the items endpoint that returns all items. Again, we click on “Try it out” button and execute the request. We can see our item in the response body. Let’s copy the id of our item.
Now open the get endpoint with the id in the URL, try it out again and paste the item id. And again, we get the item in the response body.
Let’s head back into Visual Studio to implement put and delete endpoints.
Create a Put endpoint
We use the MapPut method to define a put endpoint. Similar to the post endpoint, we use the Item type as the first parameter in the anonymous method and the IItemRepository as the second parameter.
app.MapPut("/items", (Item item, IItemRepository itemRepository) =>
{
  itemRepository.Update(item);
});
We call the Update method on the itemRepository and provide the item.
Create a Delete endpoint
Last but not least, we implement a delete endpoint using the MapDelete method and provide /items/{id} as the route argument. Within the anonymous method, we again define the first parameter as the id of type Guid and the second parameter of type IItemRepository.
app.MapDelete("/items/{id}", (Guid id, IItemRepository itemRepository) =>
{
  var item = itemRepository.Get(id);
  itemRepository.Delete(item);
});
We first get the item from the itemRepository using the Get method and providing the id as its argument.
Next, we call the Delete method on the itemRepository and provide the item.
Testing the Put and Delete endpoints
Before we talk about the difference between minimal APIs and APIs with controllers, let’s do another test to see if the put and delete endpoints work as expected. Let’s start the application one more time.
First, let’s post an item using the default values. Next, we want to get all the items in the shopping cart by calling the get items endpoint. Next, we execute the put endpoint and change the description and the quantity. Again, we use the get all endpoint to verify if the data has changed.
Last but not least, we use the delete endpoint and provide the item id. As a final test, we call the get items API again to see an empty list returned in the response body.
Great. Now let’s talk about the differences between Minimal APIs and APIs with controllers.
Differences between minimal APIs and APIs with controllers
Minimal APIs offer a short syntax to create HTTP handlers for all HTTP methods. We can define custom routes and use dependency injection in the handler methods.
Minimal APIs only support a subset of what the full ASP.NET Core using controllers can do. Let’s go through the limitations of Minimal APIs and the differences between Minimal APIs and APIs with controllers.
- First, there is no support for filters. For example, you cannot use action filters, authorization filters, result filters, or exception filters.
- Second, there is no support for form bindings. On the official documentation, Microsoft states that it is planned to add support in the future.
- Third, there is no built-in validation support, for example, using the IModelValidator interface.
There are a few more differences, and you can look them up in the link in the video description. However, I think those three differences to be the most important.
When should you use Minimal APIs?
That finally takes us to the question you have been waiting for. What use cases fit Minimal APIs, and when should you use controllers?
The simple answer is you can choose yourself. The better answer is: It depends.
- When you start a new project and want to implement a simple web API that returns some data, I suggest starting it using minimal APIs. It just saves some time and keeps things simple.
- If you are familiar with Node, specifically Express, you’ll most likely want to start with minimal APIs because it feels more natural.
- If you start an enterprise-scale backend, using controllers might be the better choice because you might want to use some of the features only available when working with controllers.
In the end, you are free to choose whatever you like, and you can always migrate from one approach to the other. Especially migrating from Minimal APIs to controllers isn’t very time-consuming.
Conclusion
We learned what Minimal APIs are, how to implement them, and when to use them compared to Controllers.
Minimal APIs are, after all, another option, another tool for your toolbelt to use at the right time and can be a solution for the right problem.
We haven’t talked about authentication in this video. It is possible to protect API endpoints against unauthenticated requests. If that is interesting to you, leave a comment below or tell me what else you want to learn in .NET development.


