
Rate limiting is the concept of restricting access to an API based on the number of requests. Rate limiting can serve three purposes.
First, it increases security. We can limit how many times an endpoint can be called. If we know how many users we have, we can set a reasonable limit and protect against brute-force or denial-of-service attacks.
Second, it helps us save money. A rogue user or an attacker repeatedly calling a consumption-based API will cost much money. Restricting or limiting the number of calls an API can perform in a given time frame protects against exponential costs.
Last but not least, when you build a public API, you might want to limit the number of requests for free users and have different limits for premium customers.
We will learn how to use the rate limiting introduced in .NET 7 using an ASP.NET Core WebAPI application.
Defining a Rate Limiter
I create an ASP.NET Core WebAPI project using Minimal APIs and .NET 7.
First of all, we define a rate limiter. We use the AddRateLimiter extension method to register a rate limiter in the service collection of the application. We use an anonymous method and provide rate limiter options as the argument.
builder.Services.AddRateLimiter(rateLimiterOptions =>
{
    rateLimiterOptions.AddFixedWindowLimiter("fixed", options =>
    {
        options.PermitLimit = 1;
        options.Window = TimeSpan.FromSeconds(5);
        options.QueueLimit = 0;
    });
});
We use the AddFixedWindowLimiter to define a rate limiter with a fixed window. We use “fixed” as the policy name. Later, I will explain the different rate-limiting algorithms that you can use.
For the FixedWindowRateLimiterOptions, we set three properties. First, we set the permit limit to 1. It’s the number of requests that are allowed to happen. Next, we set the window to 5 seconds, using the static FromSeconds method on the TimeSpan type. Last but not least, we set the QueueLimit to 0. I’ll talk about queuing requests later.
Since rate limiting comes with .NET 7 out of the box, we do not need to install additional NuGet packages.
Enabling the Rate-Limiting Middleware
Now that the rate limiter is configured, we need to enable the rate-limiting middleware. We only need to use the UseRateLimiter extension method on the WebApplication object. Very simple.
app.UseRateLimiter();
Rate Limiting a Minimal API
Next, we want to apply the rate limiting to a specific endpoint. When working with Minimal APIs, we can use another extension method called RequireRateLimiting on the EndpointRouteBuilder. As the argument, we provide the policy name.
app.MapGet("/weatherforecast", () =>
{
    var forecast = Enumerable.Range(1, 5).Select(index =>
        new WeatherForecast
        (
            DateOnly.FromDateTime(DateTime.Now.AddDays(index)),
            Random.Shared.Next(-20, 55),
            summaries[Random.Shared.Next(summaries.Length)]
        ))
        .ToArray();
    return forecast;
})
.RequireRateLimiting("fixed") // Enable rate limiting for this endpoint
.WithName("GetWeatherForecast")
.WithOpenApi();
Testing the rate-limited API
Now that we defined the rate-limiting policy, enabled the rate-limiting middleware, and specified our endpoint to require rate-limiting, we want to test if it works as expected.
We start the application and use the SwaggerUI to execute the get requests on the WeatherForecast endpoint. To monitor the requests, I open the developer tools and display the network tab.
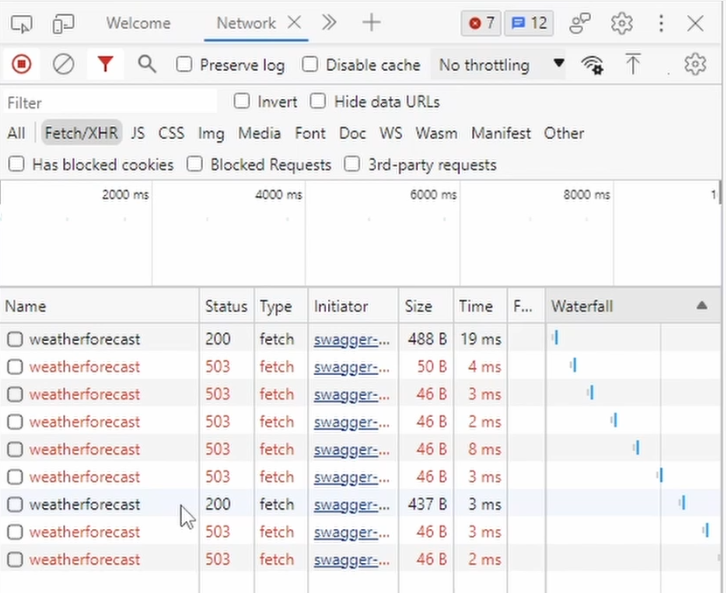
I repeatedly trigger the endpoint. As you can see, the first request completes, and the following requests return a 503 status code. After I clicked a few times, the configured 5-second window was over, and another window started. Therefore, another request is completed.
In this case, I think a 503 status code meaning Service Unavailable, isn’t the best choice. Instead, I want to return a 429 Too Many Requests.
Let’s quickly jump back into the code and change it. The RateLimiterOptions have a RejectionStatusCode property that we can set to 429. I use the StatusCodes class, providing named constants.
builder.Services.AddRateLimiter(rateLimiterOptions =>
{
    rateLimiterOptions.AddFixedWindowLimiter("fixed", options =>
    {
        options.PermitLimit = 1;
        options.Window = TimeSpan.FromSeconds(5);
        options.QueueLimit = 0;
    });
    // Changing the status code
    rateLimiterOptions.RejectionStatusCode = StatusCodes.Status429TooManyRequests;
});
Let’s start the program and test it again. Again, I open the console and trigger the get method a few times.
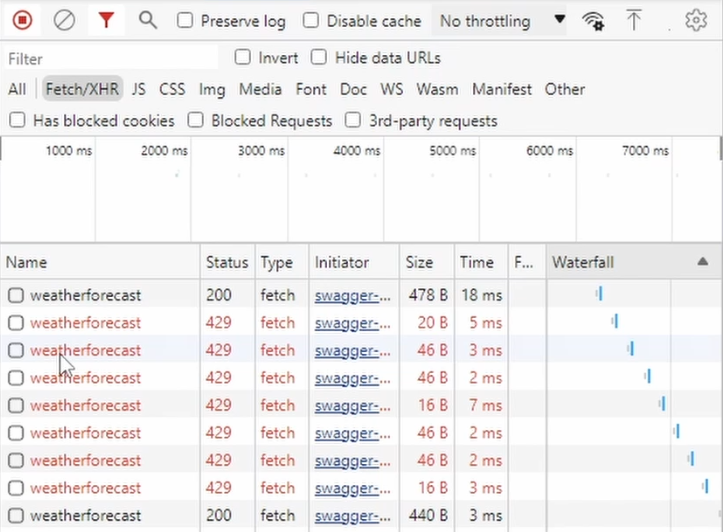
As you can see, the failed requests now return the 429 status code instead of 503.
Rate Limiting a Controller-based Project
Before discussing the four rate limiter algorithms we can choose from, I want to show the same example for Controller-based ASP.NET Core WebAPI applications.
The definition of the rate limiter is the same for Controller-based ASP.NET Core applications. We also need to add the rate limiter middleware using the UseRateLimiter extension method on the WebApplication type.
builder.Services.AddRateLimiter(rateLimiterOptions =>
{
    rateLimiterOptions.AddFixedWindowLimiter("fixed", options =>
    {
        options.PermitLimit = 1;
        options.Window = TimeSpan.FromSeconds(5);
        options.QueueLimit = 0;
    });
});
app.UseRateLimiter();
Enabling the rate limiter for endpoints is different for Controller-based projects. In the WeatherForecastController, we use the EnableRateLimiting attribute and provide the name of the policy as its argument.
using Microsoft.AspNetCore.Mvc;
using Microsoft.AspNetCore.RateLimiting;

namespace RateLimiterController.Controllers;

[ApiController]
[Route("[controller]")]
[EnableRateLimiting("fixed")] // Enable rate limiting
public class WeatherForecastController : ControllerBase
{
    // (...) code omitted

    [HttpGet(Name = "GetWeatherForecast")]

    [DisableRateLimiting] // Optionally disable rate limiting
    public IEnumerable<WeatherForecast> Get()
    {
        return Enumerable.Range(1, 5).Select(index => new WeatherForecast
        {
            Date = DateOnly.FromDateTime(DateTime.Now.AddDays(index)),
            TemperatureC = Random.Shared.Next(-20, 55),
            Summary = Summaries[Random.Shared.Next(Summaries.Length)]
        })
        .ToArray();
    }
}
We can set the attribute on the controller level, as shown in this example, or we can set it on specific methods. We can also enable the rate limiter on the class level and turn it off for a specific method using the DisableRateLimiting attribute.
When we start the application and execute the get endpoint multiple times, we get the same result as with the Minimal API project. The first request gets executed, and the following requests are rejected until the defined 5-second window is over.
Built-in Rate Limiter Algorithms
Now, let’s talk about the four built-in algorithms that define how the rate limiter restricts access to the endpoint.
- Fixed Window:
The AddFixedWindowLimiter restricts access based on a fixed time frame. For example, we can allow ten requests per second. Or we can allow 50 requests per minute.

- Sliding Window:
The Sliding Window algorithm is based on the Fixed Window algorithm but allows for a more complex definition. When using a Sliding Window, the time frame is split into multiple segments.The requests used in a segment are rolled over to the next segment. After the window expires, the available requests are calculated per segment. It’s a more granular approach compared to a Fixed Window. Consider the following example: We define a sliding window of 60 seconds or a minute and allow 100 requests. We define six segments. The first segment uses ten requests. We have 90 requests left for the second segment. The second segment uses 70 requests; we have 20 left. The third segment uses the remaining 20 requests. It means that we run out of requests for the fourth, fifth, and sixth segments.
When the first segment of the second window starts, we get the ten requests back that we used in the first segment of the first window.
- Token Bucket:
A Token Bucket has an upper limit of the available requests. It adds a number of requests per time frame but does not exceed the upper limit. Consider the following example: We set the number of available tokens to 100. We set 20 tokens per period, and we set the replenishment period to 20 seconds. It means that we fill the bucket with 20 tokens whenever 20 seconds are passed. However, the bucket can never contain more than 100 tokens.
This algorithm allows for scenarios where we want to allow a burst of many requests in a short time but want to limit the number of requests in a time frame.
The difference between a Token Bucket and a Fixed Window is that for the Fixed Window, once the limit is exceeded, we cannot make new requests until the window is over. With a Token Bucket, we can define how fast or slow new tokens are added to the bucket allowing for new API requests.
- Concurrency:
The concurrency algorithm works differently and limits the number of simultaneous requests. Each starting request reduces the concurrency limit by one. When the request is finished, it increases the limit by one. The configuration is very simple. For example, we can allow five concurrent requests on an endpoint.

Queueing Requests
Besides selecting one of the four algorithms, we can also configure a queue to handle incoming requests. We use the same fixed rate limiter configured before.
We now set the QueueLimit property to 2 and the QueueProcessingOrder to OldestFirst.
builder.Services.AddRateLimiter(rateLimiterOptions =>
{
    rateLimiterOptions.AddFixedWindowLimiter("fixed", options =>
    {
        options.PermitLimit = 1;
        options.Window = TimeSpan.FromSeconds(5);
        options.QueueLimit = 2;
        options.QueueProcessingOrder = QueueProcessingOrder.OldestFirst;
    });
    rateLimiterOptions.RejectionStatusCode = StatusCodes.Status429TooManyRequests;
});
When we start the application and execute the get endpoint, we get an immediate result for the first execution. The second execution doesn’t provide an immediate result. It isn’t rejected but also not executed. It takes a few seconds until the request is executed.
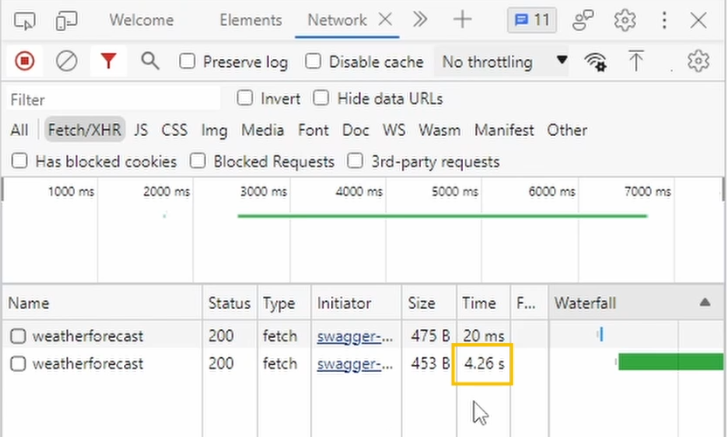
The reason is that the request is put into the queue because there is no request permitted within the remaining 5-second window. As soon as a new window starts and another request is permitted, the request is taken off the queue and handled.
Besides using a queue, you can also define the retry behavior or insert custom code to handle rejected requests. But those two topics aren’t discussed in more detail in this video. Take a look at the documentation to learn more about it.
Custom Rate Limiting Implementations
I want to give you two possible scenarios for custom rate-limiting policies:
- For example, you could implement a rate limiter that limits the number of requests per authenticated user.
- Or, for a multi-tenant system, you could limit the number of requests per tenant. I won’t do that, but it’s helpful to know that it can be done.
Testing Rate Limited Endpoints
When using any rate limiter, make sure to test your application before deploying it to production. There is nothing worse than blocking justified requests by a misconfigured rate limiter.
Depending on how complex your solution is, you can either build a small tool firing HTTP requests yourself, use Postman, or use one of the more capable tools, such as JMeter.
The Code Wolf has a great video where he tests the different rate limiter algorithms using JMeter.
Conclusion
Rate Limiting allows us to control how many times our APIs are executed. It helps us protect against attackers and cap the cost of consumption-based APIs.
If you build a paid API, it can also limit the number of requests according to the service level the customer paid.
Let me know what you think of the general concept of rate-limiting API endpoints and whether you plan to implement it in your ASP.NET Core applications.
Remember to subscribe to my YouTube channel if you still need to.


