This blog post is part of a blog post series. In this series, I am going to explain how I setup TeamCity on the Microsoft Azure cloud and how I integrated different types of applications for automated build, test, and deployment.
Also in this series:
Previously in the first article of this series, we set up TeamCity on a Microsoft Azure virtual machine as our continuous integration and deployment service.
In this particular article, we are going to set up our first build to our newly created build environment. In this case, it is an ASP.NET Core application.
The Goal
After reading this article, you are familiar with setting up a build for an ASP.NET Core application on TeamCity. I tell you the basic configuration steps and which software is required to set up a CI build for an ASP.NET core application.
The source code of our application is hosted on a private GitHub repository. TeamCity will automatically grab the newest source code after a check-in to the source code repository happened.
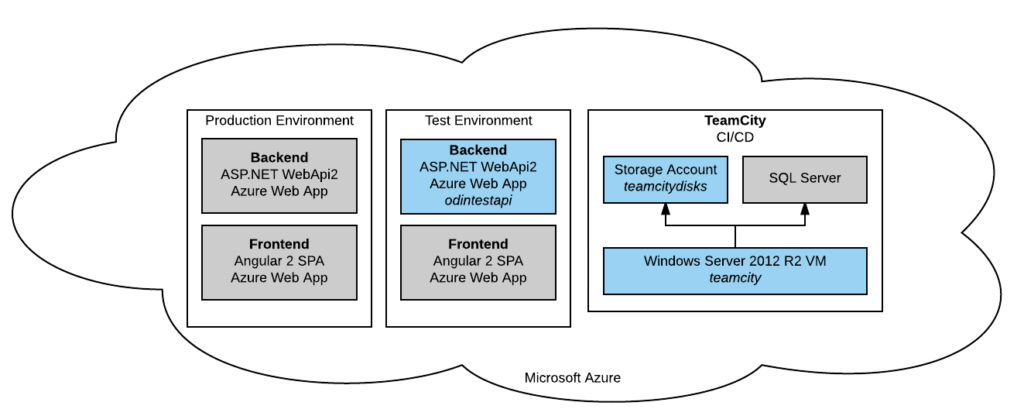
In the end, our cloud infrastructure will look like the picture above. In a previous article, we created and set-up a virtual machine running TeamCity and its storage account. All of the blue components above will be running after this article.
In this article, we are going to create an Azure Web App and setup a continuous integration and continuous deployment process in TeamCity. After a successful build, TeamCity will publish our application automatically to the Azure Web App.
Creating the Azure Web App
First of all, we need to create the target of our deployment process. We login to the Azure portal and create a new Web App resource. We do so by clicking on the green plus in the top left corner of the Azure portal.
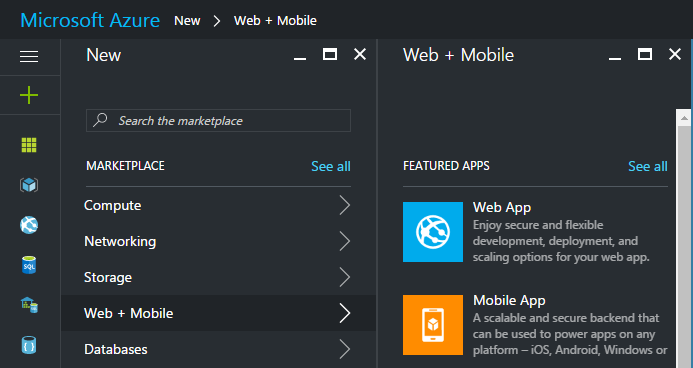
In the marketplace, we click on the Web + mobile section and afterward on the Web App which is featured in the first position of the list.
The configuration of a Web App is quite simple. We have to choose a name which will identify the resource uniquely on Azure. That means that the name chosen will be used as part of the URL in the format [name].azurewebsites.net.
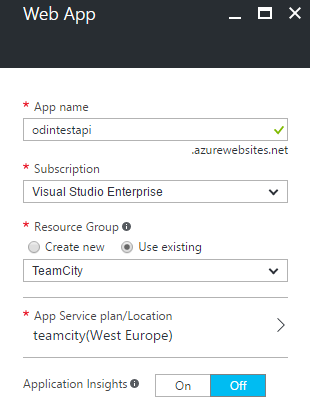
The subscription is usually set correctly, but if you have multiple subscriptions make sure you select the right subscription for your web app.
The last step in this configuration screen is to choose an App Service plan. An App Service plan is a logical plan on which multiple Web app instances run. During this article series, we will create some more Web apps all running on the same App Service plan. An App service plan is a logical unit which defines the performance and the pricing of the actual resource.
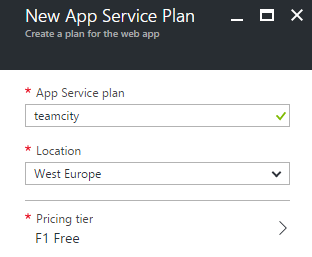
Because I just want to setup a test environment I choose to create an F1 Free type App service plan. You can change the service plan later on if you want to have a better performance.
Remember to choose the Azure region which is next to you as the location of your App service plan. This selection cannot be changed afterward.
When everything is configured correctly, we click on the Create button and the resource will be created for us within a few seconds. This process is fast. The configuration only involves a few steps, and the deployment of the resource is fast as well.
Creating a build in TeamCity
Our Web App is created. The next step is to setup the TeamCity build on the virtual machine we created in the previous article. Start the virtual machine and use Remote Desktop to connect to your virtual machine and log-in to your TeamCity administrator account.
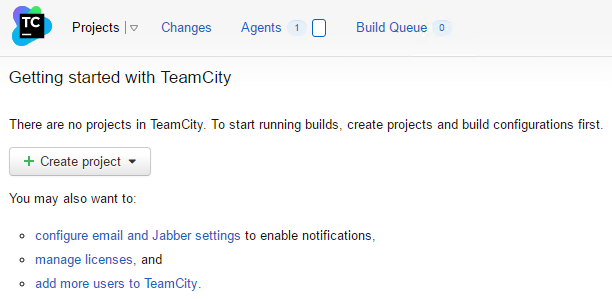
Currently, there are no projects in TeamCity. However, we are going to change that next. Click on the Create Project button in the middle of the screen and select Pointing to a GitHub repository if your sources are also located within GitHub. You can also create a build manually if your source code repository is located in a different source.
Connecting TeamCity with GitHub
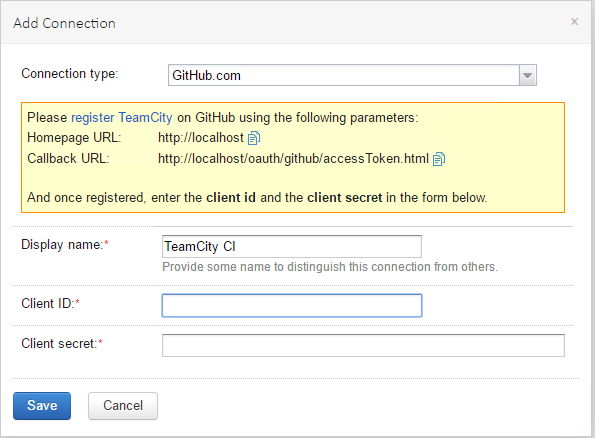
Following the information on the add connection screen, we need to login to our GitHub account and configure the connection between TeamCity and GitHub.
To do so, we log into our GitHub account, click on the profile icon in the top-right corner of the screen and click on the settings item. In the settings, we click on the OAuth Applications item in the developer section of the settings menu and create a new application.

The information required to create a GitHub OAuth application can be copied from the add connection screen in TeamCity. To prevent errors, I would copy paste all the information from TeamCity to GitHub.
On the next screen, you can set an application logo and more valuable you will find the Client ID and the Client Secret required by the TeamCity add connection screen. Copy and paste that information over again and press the save button to create the connection between TeamCity and GitHub.
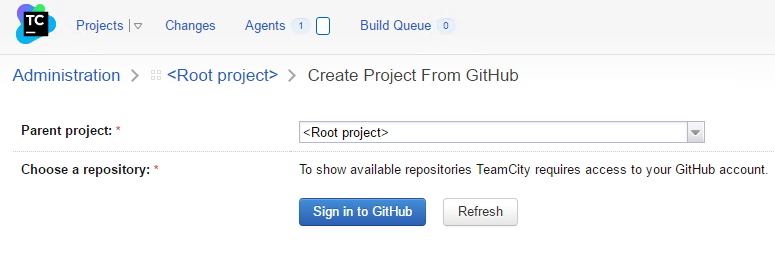
The next step is to choose the repository. To do so, we need to login to our GitHub account from the virtual machine on which TeamCity is running. There is a button on the screen which will allow us to do it, which we need to press. A pop-up opens, and we can enter our GitHub credentials and authorize the application.
After that, we see a list of all our GitHub repositories. Select the repository containing your ASP.NET Core application. Next, define the project name and the build configuration name and click proceed to continue.
TeamCity tries to auto-detect the build steps by inspecting the source within the connected repository. However, you always have the possibility to change the steps manually.
Installing the .NET Core SDK
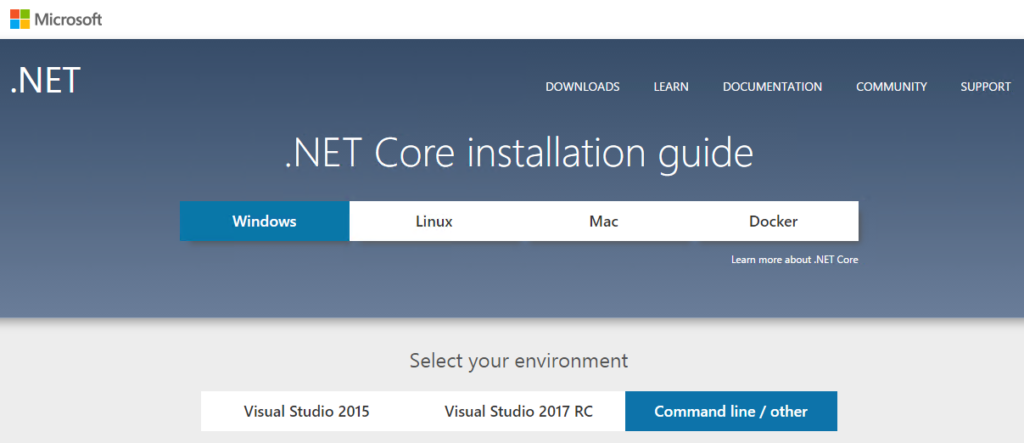
To build ASP.NET Core applications on our virtual machine, we need to install the .NET Core SDK. Go to the website and download and install the command line tool.
Installing the TeamCity Plugin for .NET Core CLI
Next, we install a plugin in for TeamCity which integrates the .NET Core command line SDK into the TeamCity configuration screen.
Go to the Plugin website and download the dotnet-core-plugin.zip file. To install the plugin, we need to copy the zip file to the correct location. TeamCity allows uploading plugins to the right directory via the administration interface. In the bottom-left corner of the screen, we can click on Plugins List and upload our downloaded .NET core CLI Plugin.

After this step, we need to restart TeamCity because TeamCity loads the Plugins during the startup of the application. If we add a new Plugin, we have to reboot TeamCity to use the new plugin.
We can restart TeamCity by going to services.msc via start run if you are running on a Windows operating system. Make sure to reboot your TeamCity Server service as well as the TeamCity Build Agent service. After restarting the services, it takes a few minutes till TeamCity is completely started and accessible through the web interface.
Preparing the deployment
To deploy from our TeamCity CI server to our Web App, we need to setup the deployment credentials. To do so, we navigate to the Web App in the Azure portal and click on the Deployment credentials menu item. We have to fill in a unique FTP username and a secure password twice.
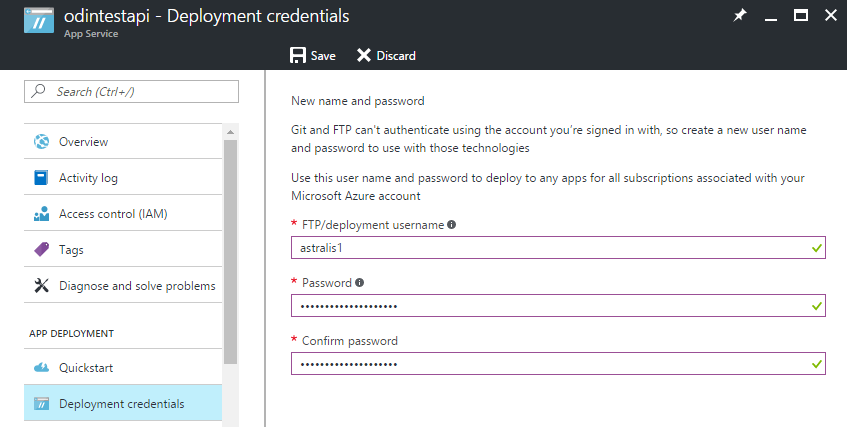
After entering and saving the credentials click on the Overview menu item and copy the FTP/deployment username and the FTP hostname. We will need that information later on during step 4 of the build configuration.
Configuring the build
We created the build, we connected to GitHub, and we installed the .NET Core SDK as well as the TeamCity Plugin for .NET Core Applications. We are finally ready to configure the build of our application.
For this article we will only setup the following basic build steps:
- Restore the dependencies and tools (dotnet restore)
- Build the application (dotnet build)
- Pack the application (dotnet publish)
- Publish the application to the Test Environment (FTP-Upload)
Step 1 – Restore the dependencies and tools
We choose the .NET Core (dotnet) Runner type for our first build step. We define a name for the build step, in this case dotnet restore, and we choose the restore command.
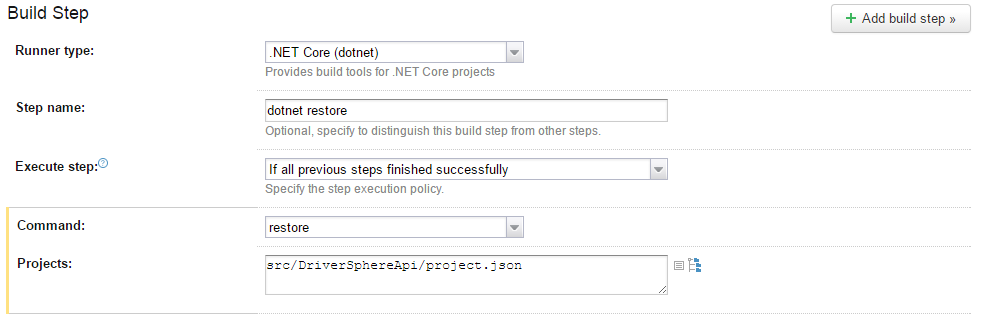
Make sure to click on the advanced options link below to make some more settings visible. We need to specify our project’s project.json file in the Projects field. The name of the folder is equivalent to the name of your GitHub repository. Click on the save button if you’ve finished the configuration.
Step 2 – Build the application
Add another build step using the .NET Core runner type. The second build step builds the .NET Core application.
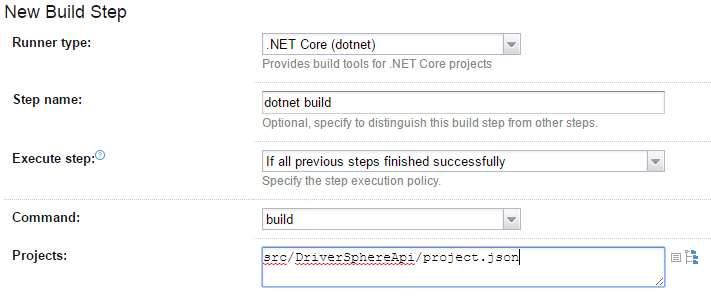
The configuration only differs from the first step by the command. Instead of the restore command, we need to choose the build command for our second step.
Step 3 – Pack the application
Add another build step using the .NET Core runner type. The third build step prepares our application for publishing. The configuration differs from the first and the second step. We specify the publish command from the dotnet cli and we set the project.json file as defined in the steps above.
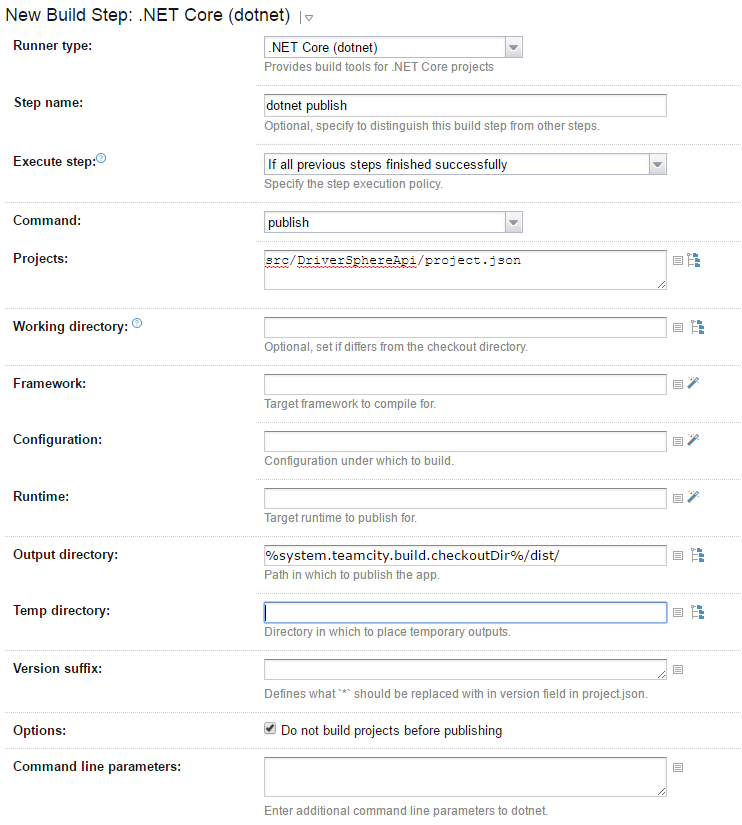
Next, we have to specify the output directory. We do this by using a TeamCity variable which points to the checkout directory of our application. Using this setting, we can define where the output of the dotnet publish command will be saved to our local disk.
We check the checkbox Do not build projects before publishing because we build the application in a previously dedicated build step. If we left this checkbox unchecked, we would slow down the build process because we build the application two times in a row which is not necessary.
Step 4 – Publish the application
For step 4 of our build steps, we select the FTP Upload runner type. This runner type is a TeamCity standard build runner. Make sure to configure the proper target host. Use the FTP address copied in the preparation chapter above and add /site/wwwroot/ to it.
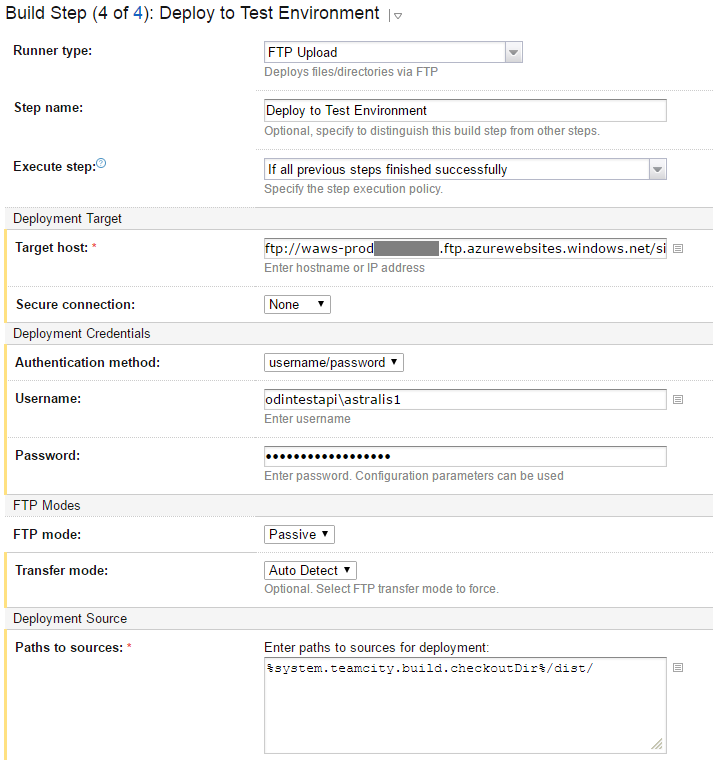
Also, enter the username including the machine name and enter the secure password defined in the Azure portal.
Last but not least add the path to the sources we want to upload. Use the same configuration as in build step 3. In our case this is %system.teamcity.build.checkoutDir%/dist/. Save the last build step.
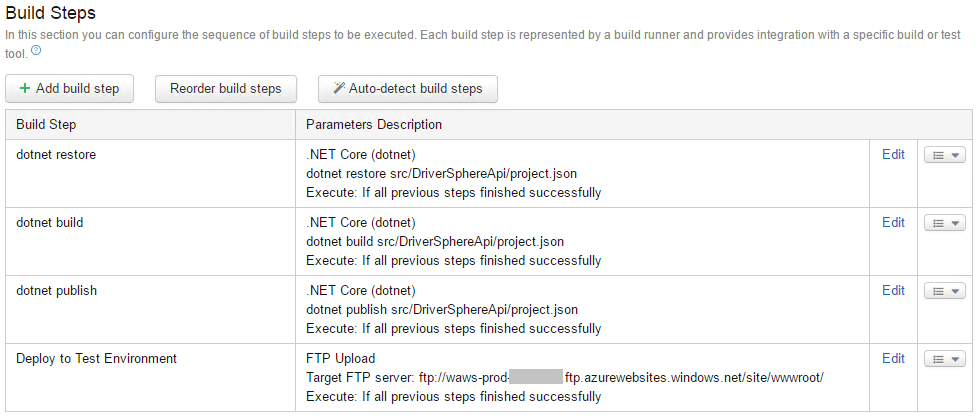
Completed build steps
If you created all your build steps according to this article you should end up with the following build steps:
Starting the first build
Because we do not push a new revision of our source code, we need to launch the build manually. We can do that by clicking on the run button on TeamCity’s home page. Click on the TeamCity logo in the top-left corner to navigate there.

If you see a green build with successful text attached you made it! You launched the first build, and the ASP.NET Core application was restored, build and published to Azure.

If the application does not work
Make sure to check the build log in TeamCity if you do not get the expected result. In my case, the third build step failed and reported an error to the build log.
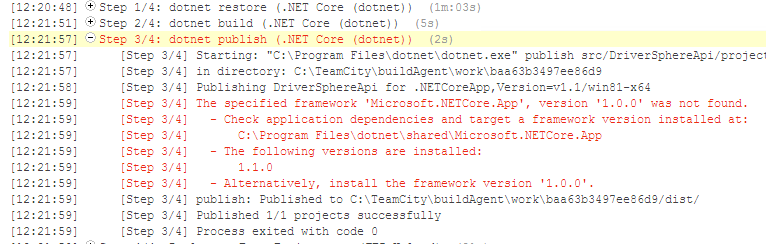
Unfortunately, the current version of the dotnet CLI tool returns 0 also if there were errors reported. Because of that TeamCity cannot detect the error and treats the return value of 0 as a success. Luckily we can see the error in the build log.
This error seems to be something with the tooling and the installed versions of the .NET Core Runtime. To fix it I downloaded and installed the .NET Core 1.0.3 Runtime to my virtual machine.
After that, I once again navigated to my application in the browser, and the application started as expected.
Final thoughts
Setting up an automated build and a simple deployment environment using TeamCity for ASP.NET Core applications is possible. It is not that simple because it involves a few steps to setup, but this article guides you through that process very smoothly.
It is definitely worth putting effort into the system because once it works, it will save you much time during the development cycle. I am aware of the fact that this is a very simple setup. You could improve it in many ways.
For example, you could set up different builds for deployment to the test environment and deployment to the production environment. So guess what? There will be an article in the future explain this in more detail.
Also be aware of the fact that the dotnet cli supports many more commands than the basic commands used in this article. Take a look at the documentation if you want to develop your solution further.
If you want to get notified about future articles in this series, fill in the form below and you will get a notification into your inbox.
Also in this series:


Hi,
thanks for htis article.
Any chance to make it working with Net Core projects targeting Net Framework 4.x ?
http://www.hanselman.com/blog/HowToReferenceAnExistingNETFrameworkProjectInAnASPNETCore10WebApp.aspx
Hi, Ella. Sorry for the late answer. I have not tried that yet. Maybe I can do it in the future. What problem do you experience?
Please keep me updated with other related and new articles, specific to this topic matter.